

"RuffRuff 予約販売" helps reduce the lost sales opportunities that occur during out-of-stock periods, before a new product launch, or while waiting for restocking.
It makes it remarkably easy to set up pre-orders on your own Shopify store, letting you register an unlimited number of pre-order products and accept an unlimited number of pre-orders. It can also restrict customers from ordering pre-order and regular products together, and can send restock notifications when the arrival date is undetermined.
It also has many unique features not found in other pre-order apps, such as a "deferred payment" feature that lets you collect payment before the product ships.
When aiming to boost sales or improve the user experience on your Shopify store, accurately understanding visitor behavior is an important challenge. You need a tool to answer questions like "why are users leaving?", "where are they getting confused?", and "what parts are they interested in?"
This article explains in detail the basic information and how to actually set up "Microsoft Clarity," a free heatmap analysis and behavior analysis tool provided by Microsoft, on your Shopify store.
Clarity is completely free to use, with no limits on the number of sites or traffic. Through features such as session analysis, heatmap analysis, and recording analysis, you can carry out data-driven improvement measures.
We introduce 2 setup methods:
- Using a Shopify app: Easy and simple
- Inserting the tag directly: Allows for advanced settings
We'll explain each step by step, including the benefits and drawbacks of each, so you can choose the setup method best suited to your store.
What Is Microsoft Clarity?
This is a free heatmap analysis and behavior analysis tool provided by Microsoft.
By setting up Clarity on your Shopify site, you can understand things like "why are visitors leaving?", "where are visitors getting confused?", and "where are visitors reading closely (i.e., interested)?"
By continuing to make on-site and content improvements using Clarity, you can also improve usability and boost your order rate.
Microsoft Clarity's Main Features
- Session analysis
- Heatmap analysis (taps, scroll, area)
- Recording analysis
Seeing is believing, so first check out the sample video below to see what kind of data you can view with heatmap analysis (taps, scroll, area).
Reasons to Choose Microsoft Clarity (Benefits)
- Completely free to use
- Unlimited number of sites you can register
- No traffic limit per site
What Are Some Use Cases for Microsoft Clarity?
- Make data-driven decisions about what's effective and what isn't.
- Test which content is most effective and where it should be placed on the page.
- Identify confusing elements on a web page.
- Understand user behavior and add the content that's needed to a page.
- Test new ideas and put them on a web page.
- Study the number of user clicks to refine what's needed.
Microsoft Clarity Documentation
2 Ways to Set Up Microsoft Clarity
Use a Shopify App
This method uses the Shopify app "Microsoft Clarity: AI Insights," released on July 17, 2025. It's characterized by effortless, easy setup, though as a drawback, advanced configuration isn't possible as of August 2025.
Benefits
- Easy to set up
- No need to create a Clarity account
- You can check data within the Shopify admin
Drawbacks
- Can't integrate with Google Analytics 4 or Google Ads
- No advanced settings such as masking sensitive data or IP blocking
Insert the Clarity Tag Directly
This method involves creating a Clarity account and directly inserting the tracking code (tag), which you can generate on the Clarity site, into your Shopify store. Compared to the Shopify app, the benefit is that you can configure more advanced settings, but the drawback is that it's not as easy to set up as the app.
Benefits
- Can integrate with Google Analytics 4 and Google Ads
- Allows advanced settings such as masking sensitive data or IP blocking
Drawbacks
- More difficult to set up compared to the Shopify app
- Requires creating a Clarity account
- You need to check data on Clarity's dedicated site
How to Set Up Microsoft Clarity (Shopify App Version)
This section introduces how to set up Microsoft Clarity on your Shopify store using the Shopify app "Microsoft Clarity: AI Insights."

(1) Access the "Microsoft Clarity" app page on the Shopify App Store
(2) Click "Install"

(3) Check the permissions the app requests, and click "Install"

(4) Open the app and click "Go to store settings"

(5) Enable the app embed named "Clarity JS"
(6) Click "Save"

Once a dashboard like the one shown above appears, setup is complete.
How to Set Up Microsoft Clarity (Clarity Tag Insertion Version)
Setting up Clarity uses Google Tag Manager (referred to below as Tag Manager), so if you haven't set up Tag Manager yet, please refer to the article below.

There are broadly 2 steps to complete
At this stage, we also recommend integrating with Google Analytics (referred to below as Analytics)
You can link Clarity's dashboard with Analytics.
Once you've identified a session you want to know more about, you can jump to the GA dashboard and dig deeper into where users are getting stuck.
Microsoft Clarity Documentation
If you haven't finished setting up Google Analytics yet, please refer to the article below.

Step 1: Create a Tracking Code (Tag) in Clarity
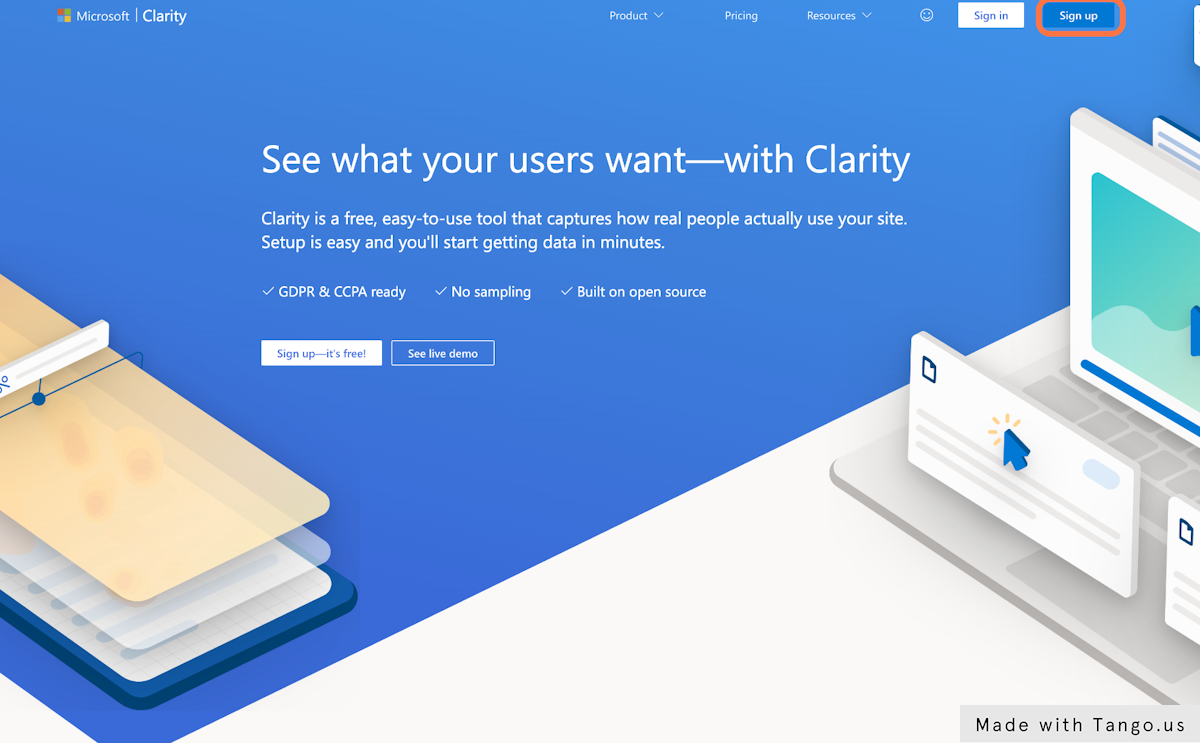
(1) From the top of the Clarity site, click "Sign up"
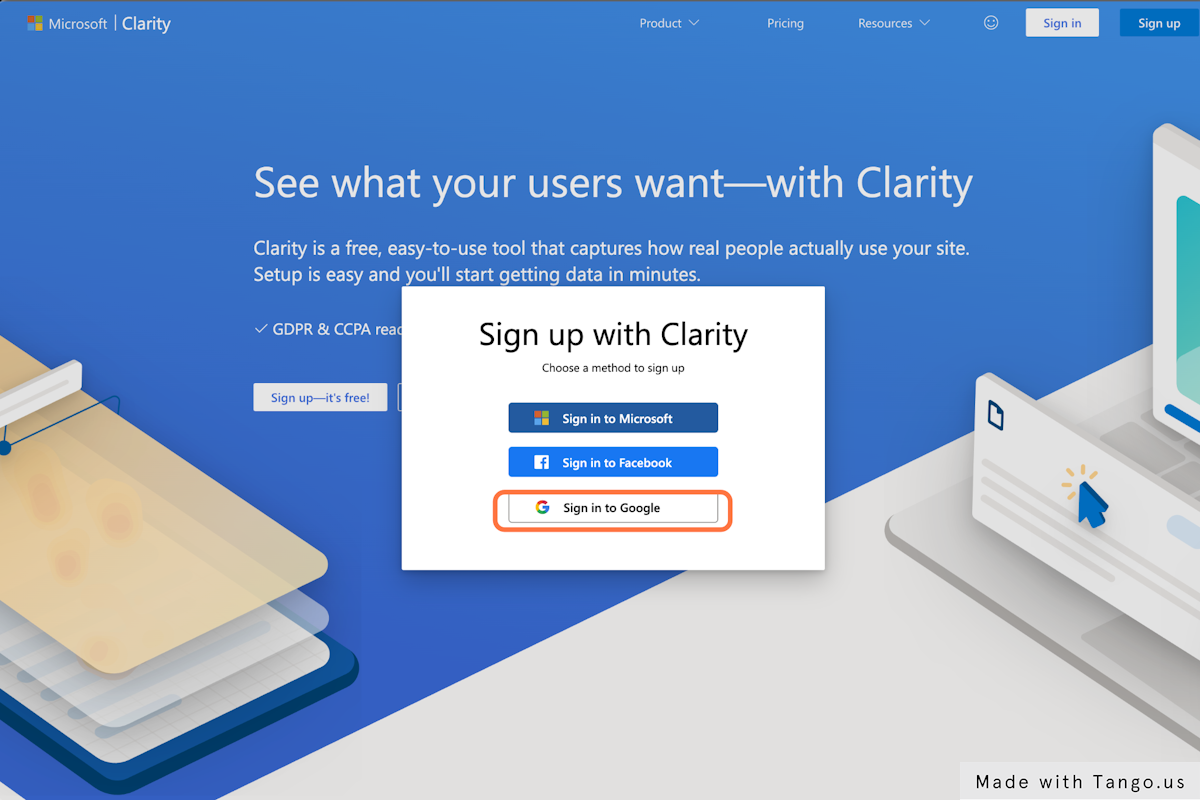
(2) Click "Sign in to Google"
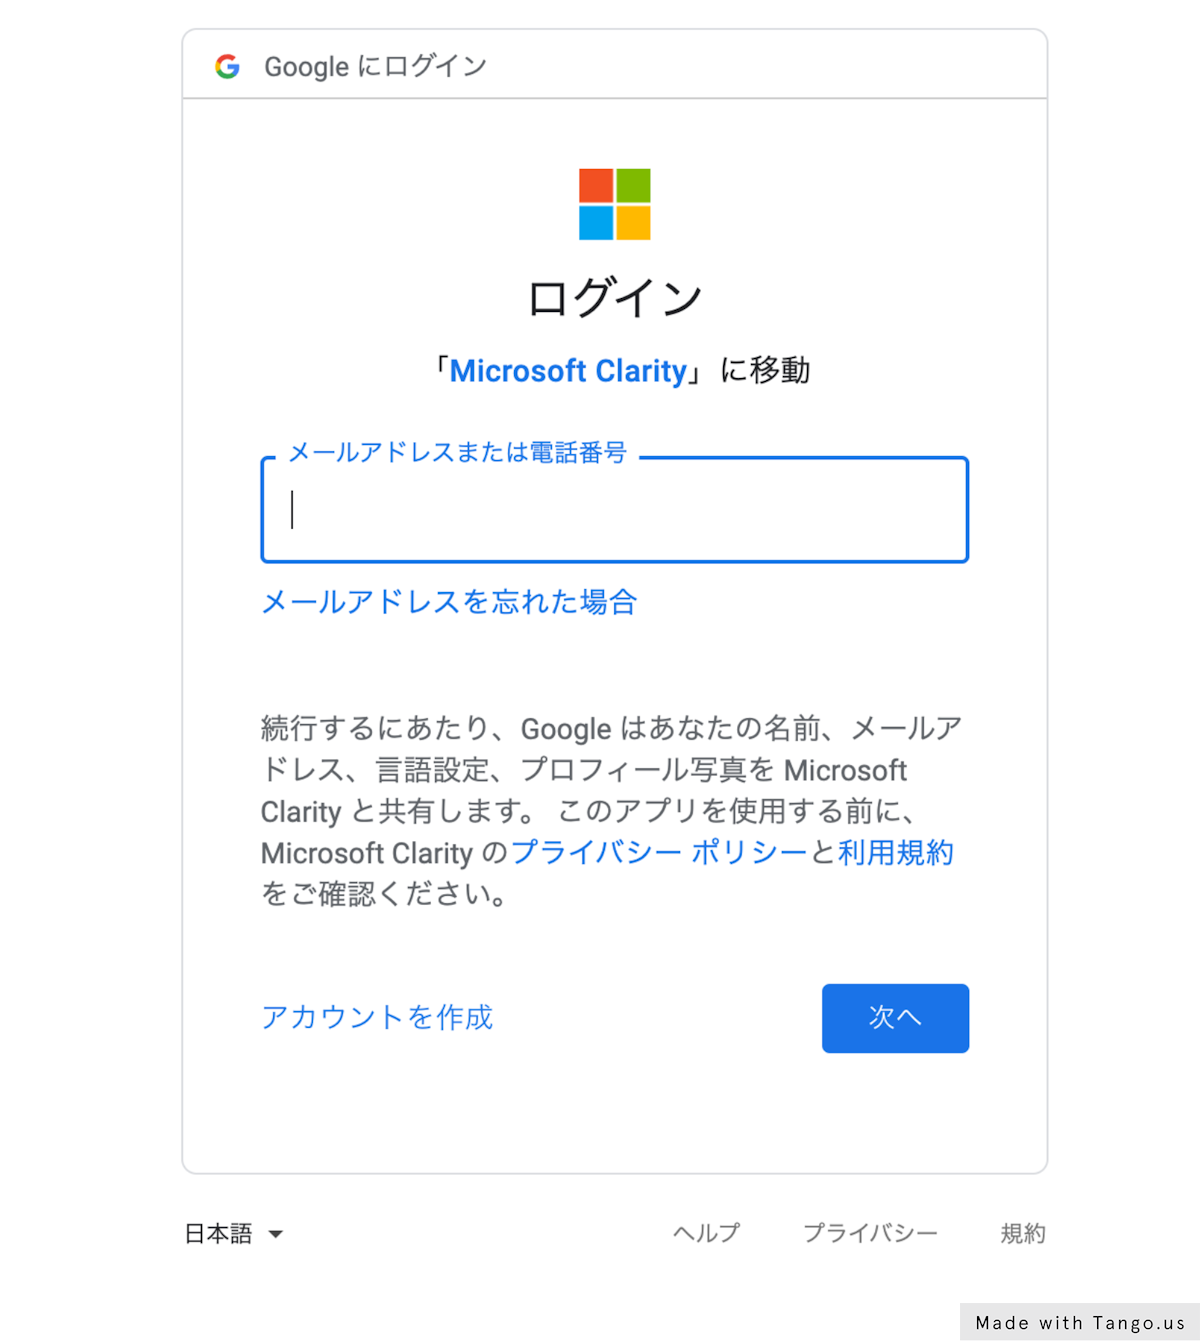
(3) Authenticate with your Google account
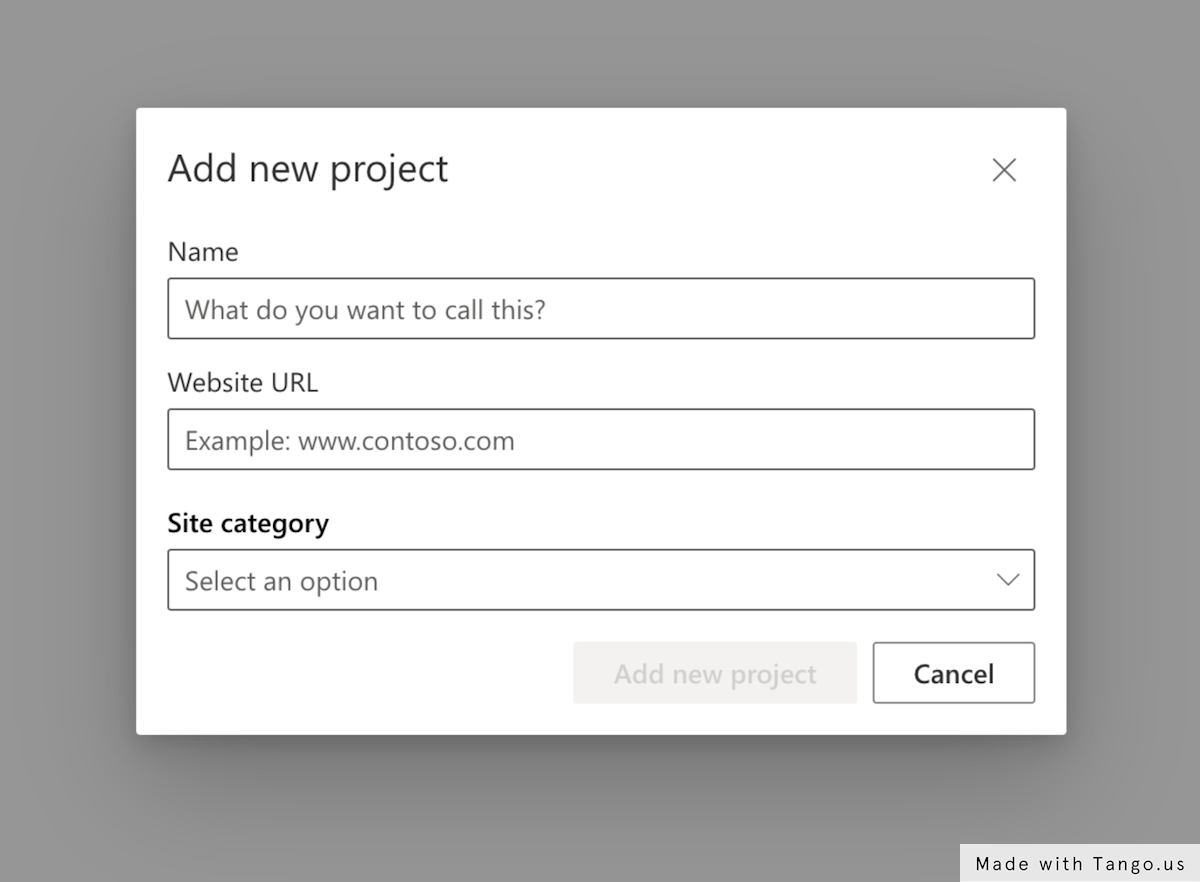
(4) Enter your project information
- Name: Enter an easy-to-recognize name, such as your site name
- Website URL: Enter the URL of the site you want to analyze with Clarity
- Site category: For a Shopify site, select Commerce
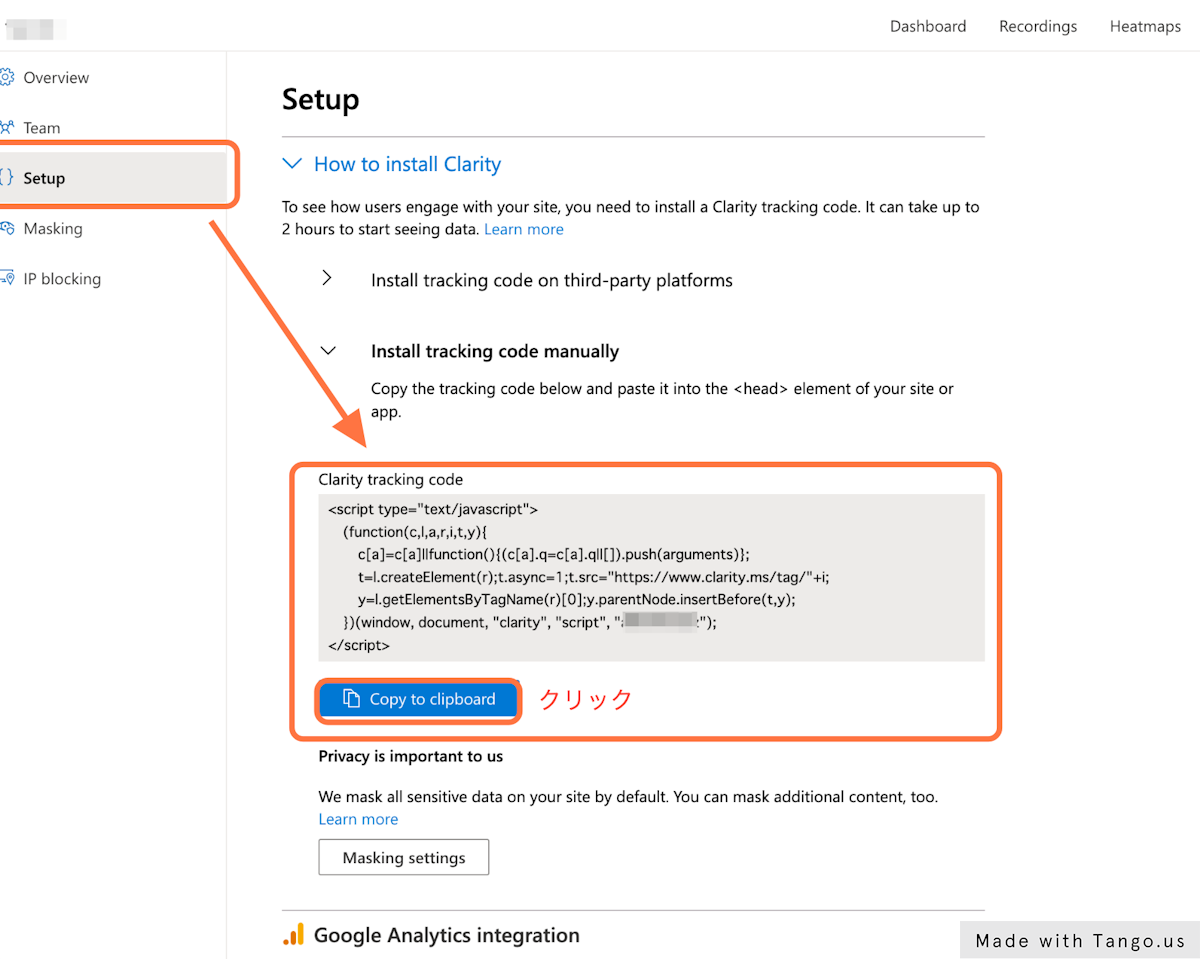
(5) After creating a project, click "Setup" in the left-hand menu
(6) Copy the "tracking code" on the Setup screen
Step 2: Set the Tracking Code (Tag) in Tag Manager
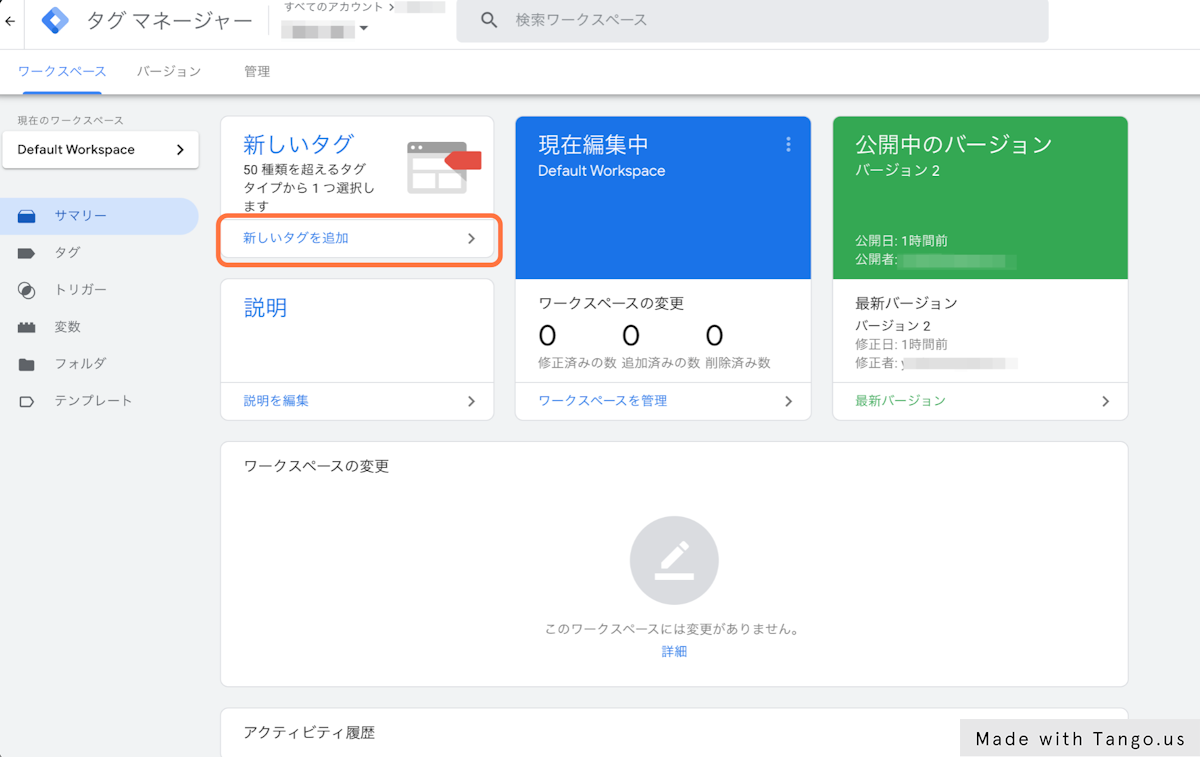
(7) Log in to Tag Manager and click "Add a new tag"
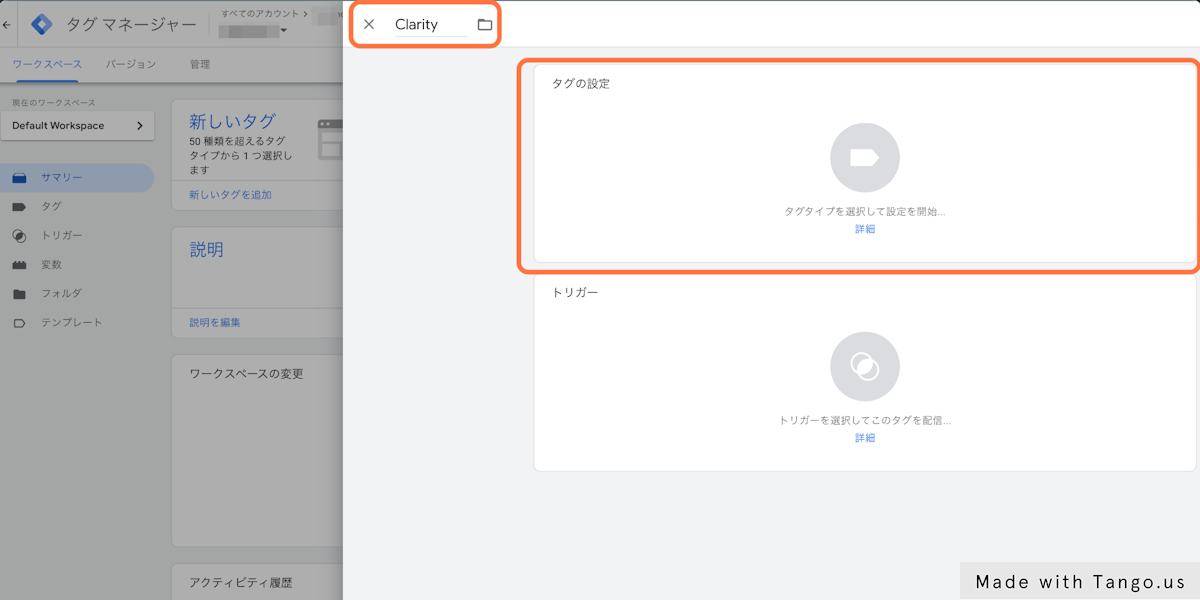
(8) Enter a tag name: enter any name you like (here we've entered "Clarity")
(9) Click Tag Configuration
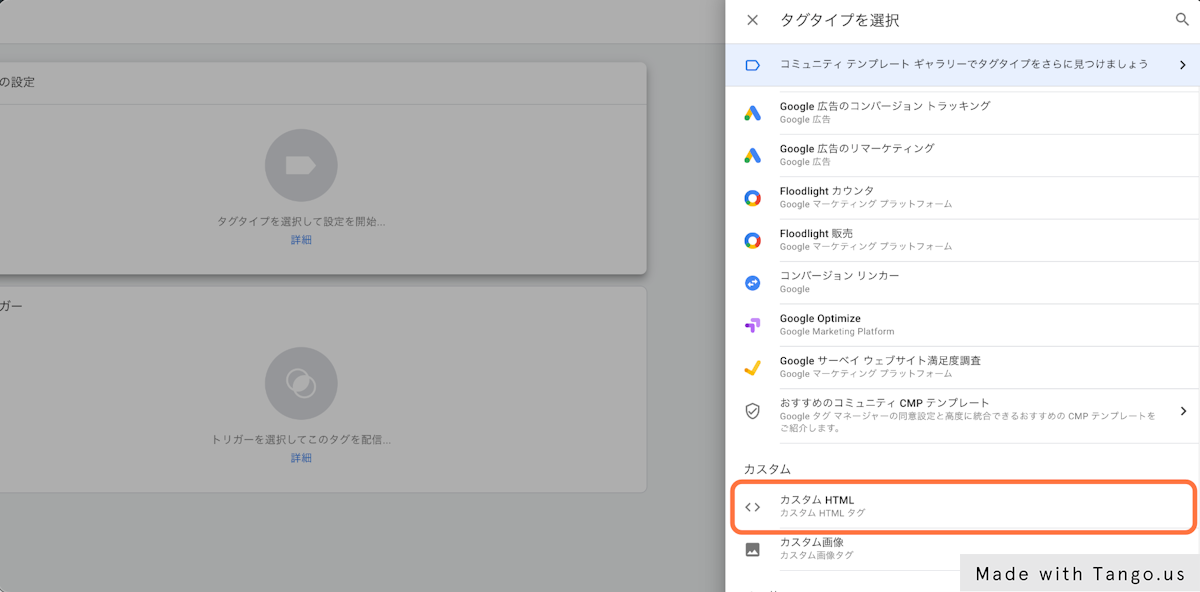
(10) Select "Custom HTML" as the tag type
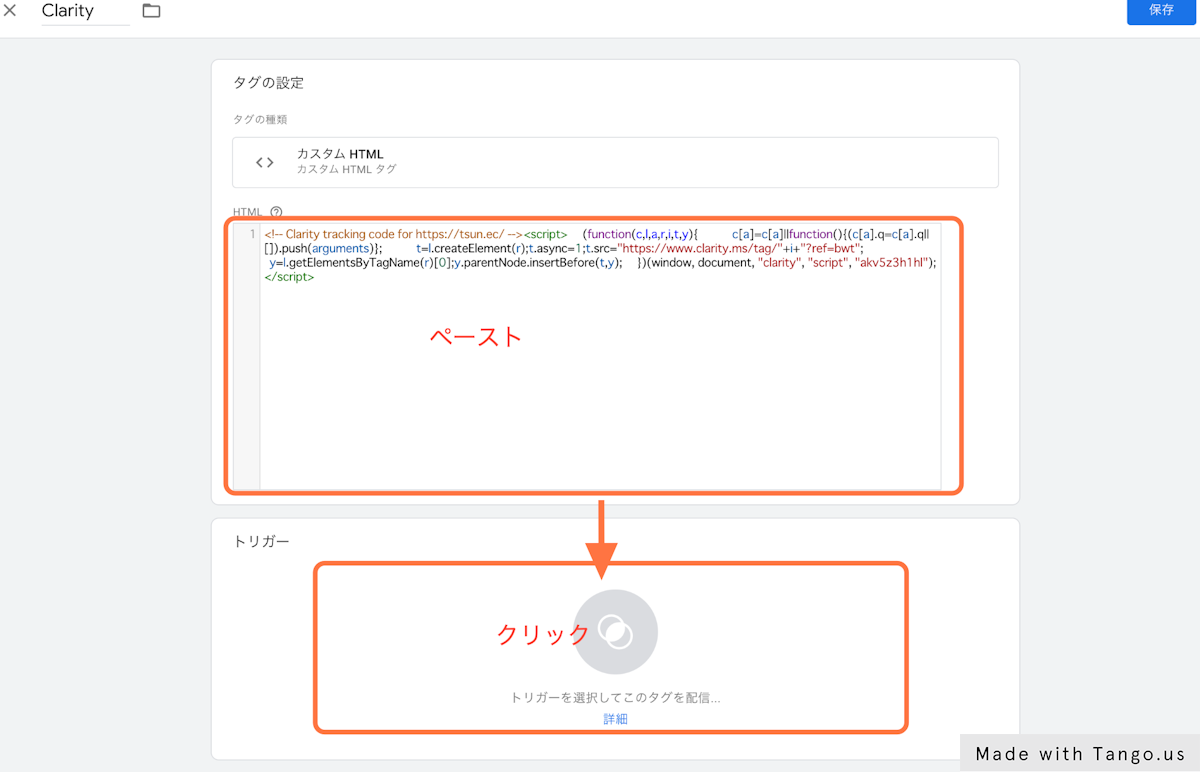
(11) Paste the "tracking code" into the HTML
(12) After pasting, click Triggering
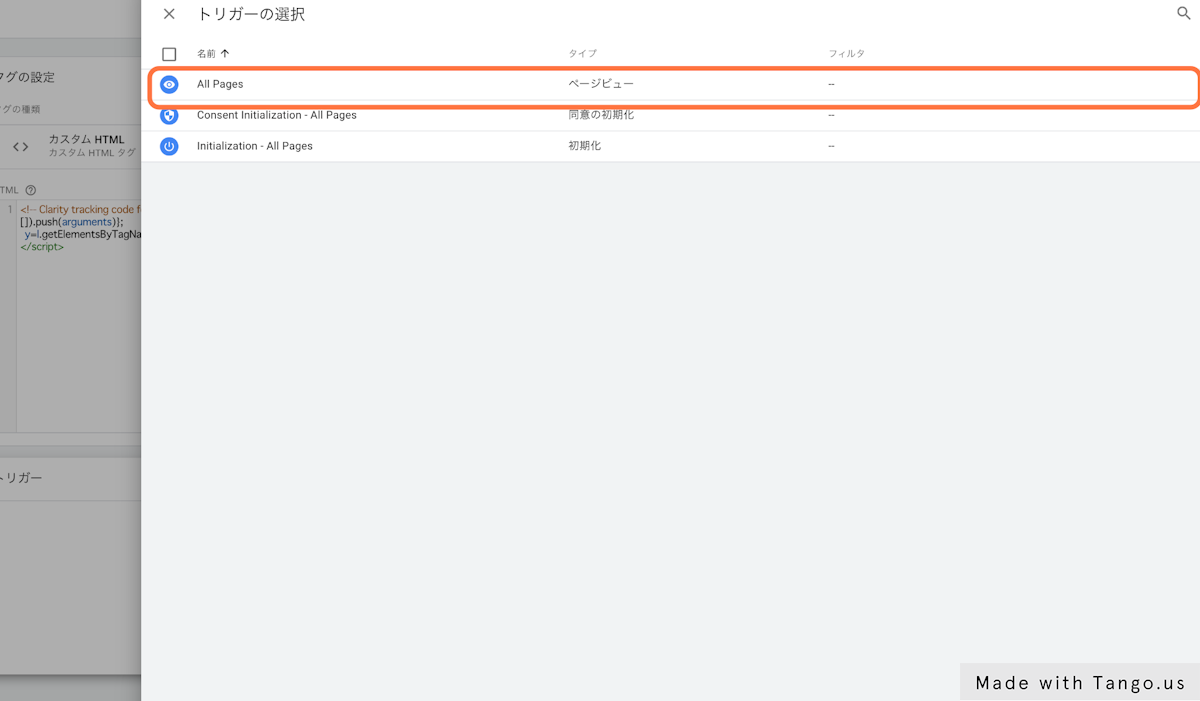
(13) Select "All Pages" from Triggering
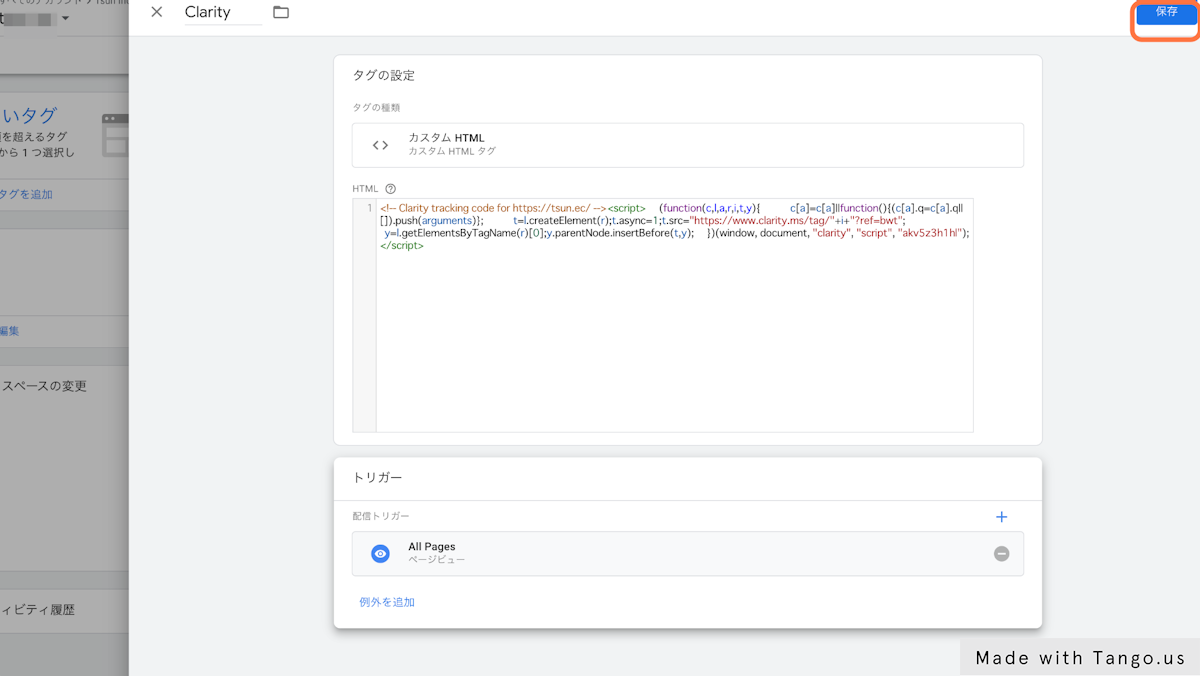
(14) Check the tag's configuration, and if everything looks fine, click "Save"
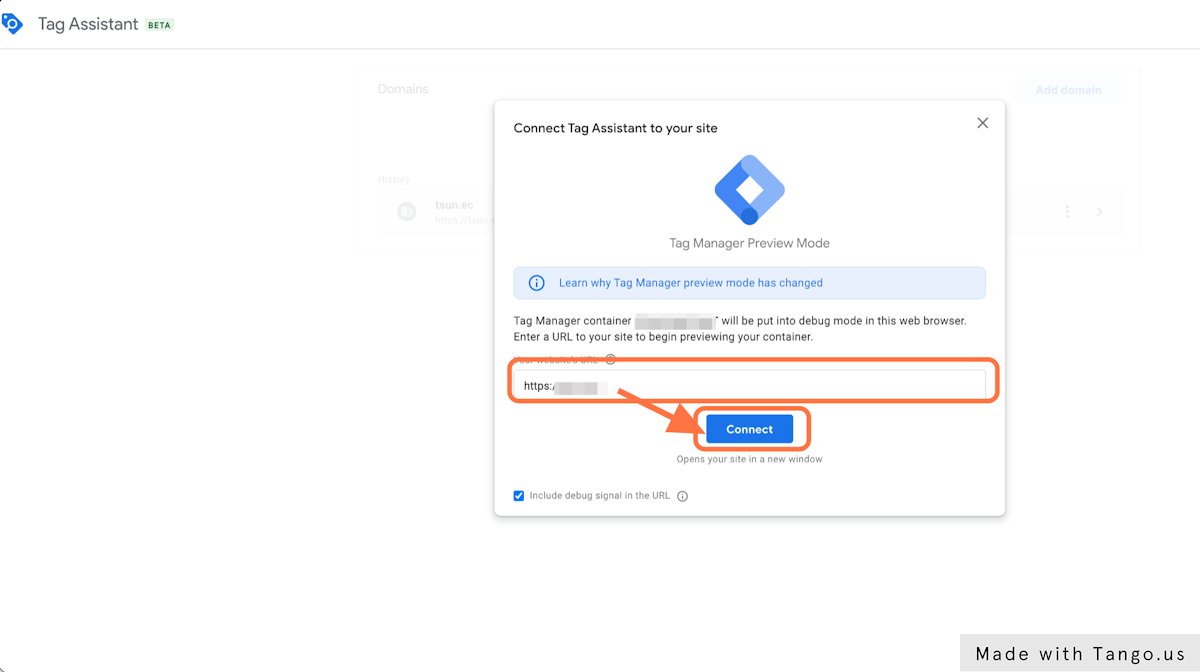
(15) Check that the tag is set up correctly in Preview mode
- Click "Preview" on the dashboard
- Enter the URL of the page you want to preview in "Website URL"
- Click "Connect"
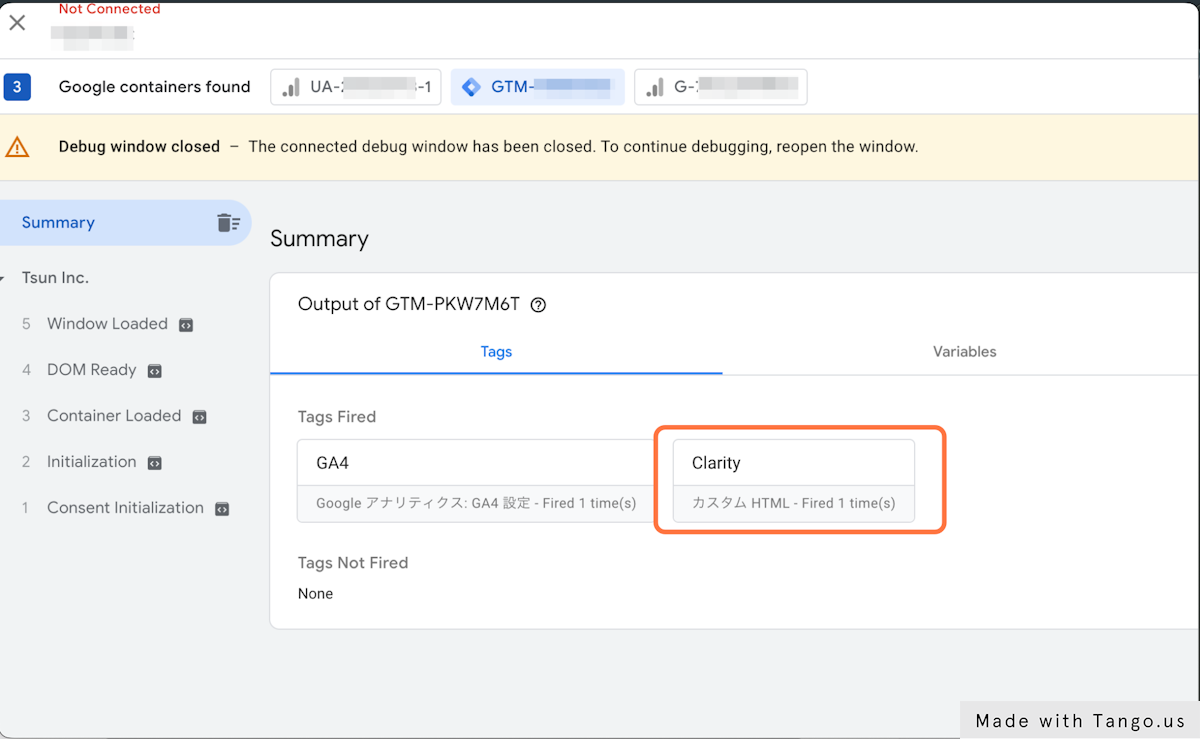
(16) Check that the configured tag is working correctly
In this case, if the "Clarity" tag appears under "Tags Fired," it's working correctly.
(Bonus) How to Link Clarity With Analytics
Once Tag Manager is set up, let's also go ahead and set up the integration with Analytics.
(17) Click the button to link with Analytics shown on Clarity's Setup screen, and proceed with Google account authentication.
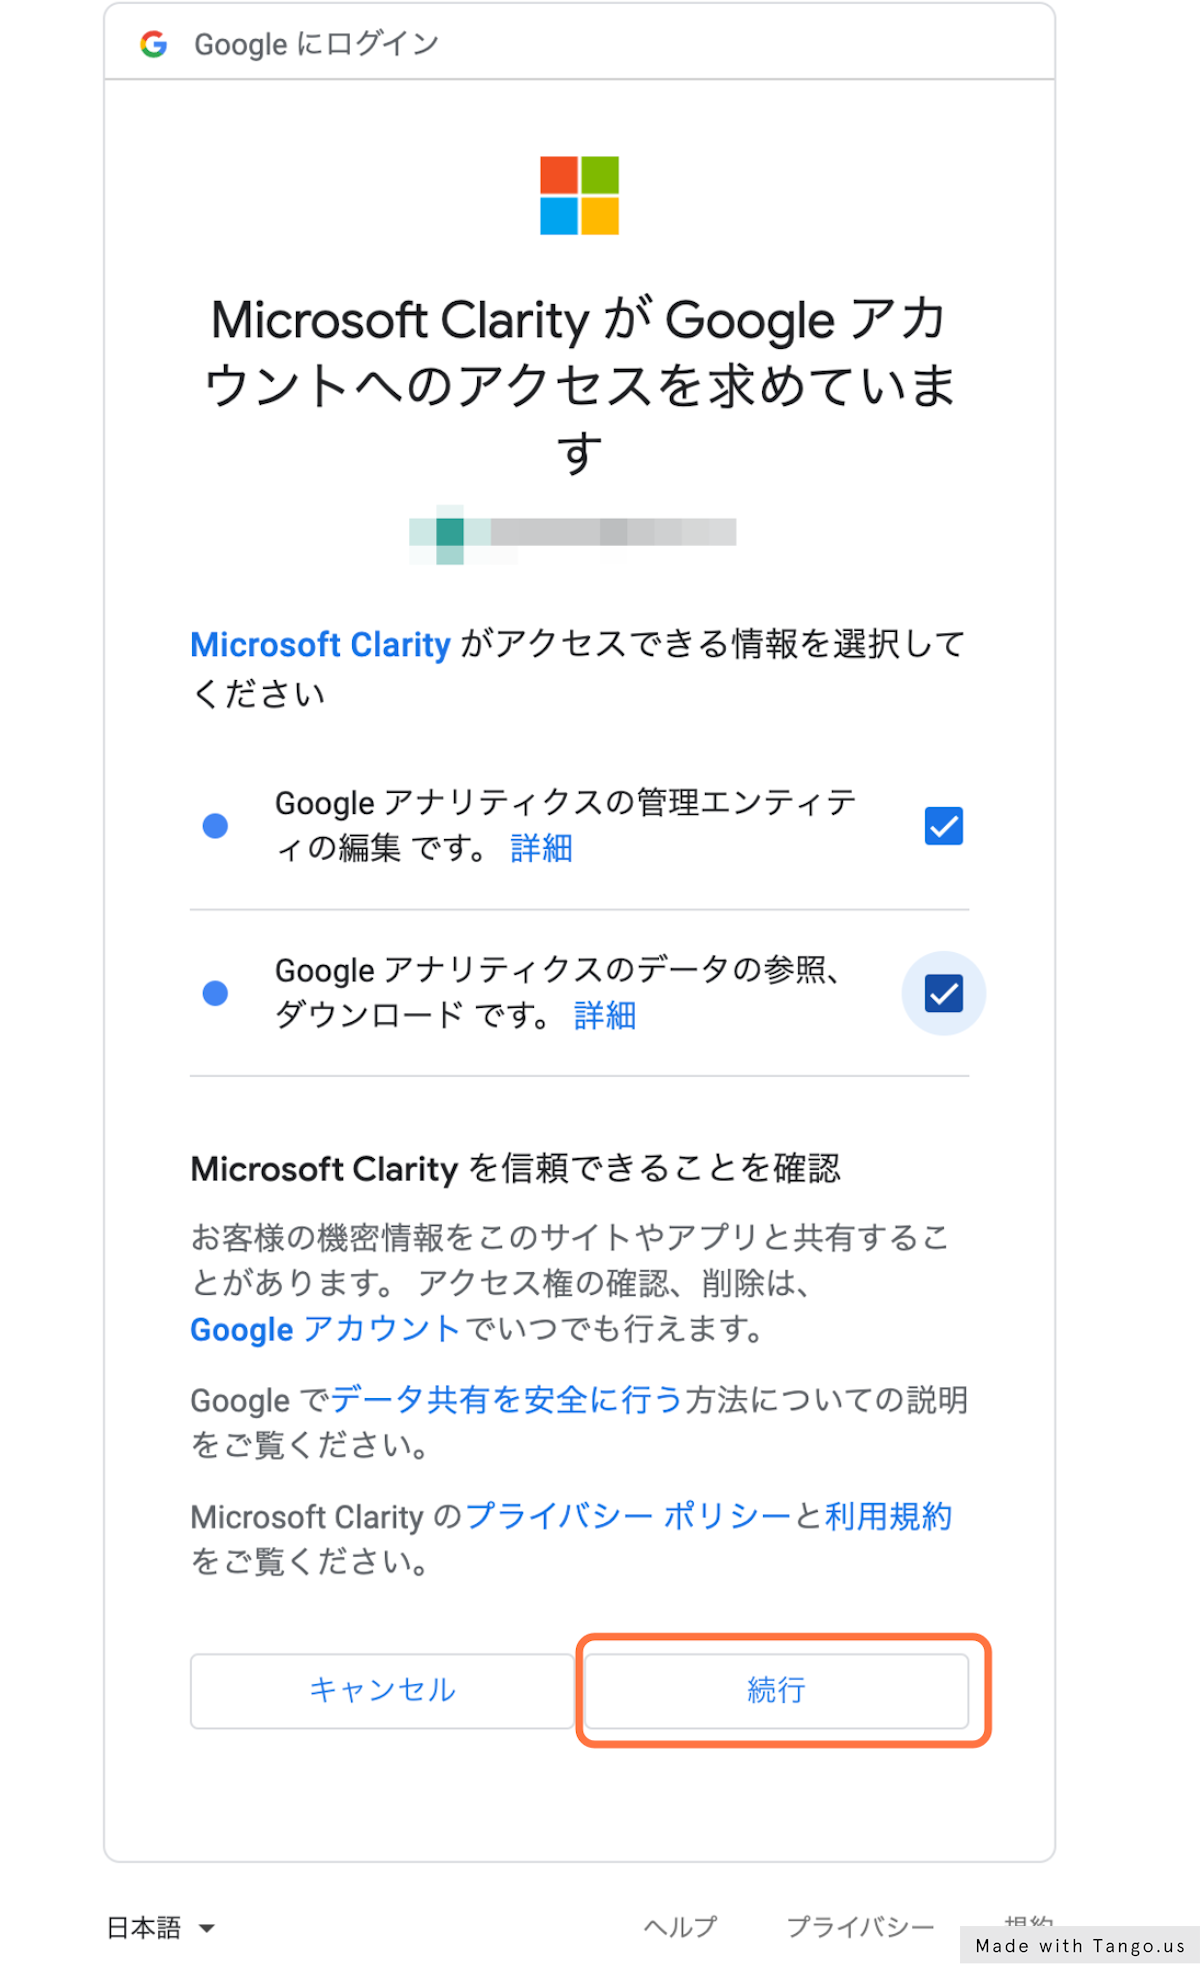
(18) Allow Clarity to access your Analytics data
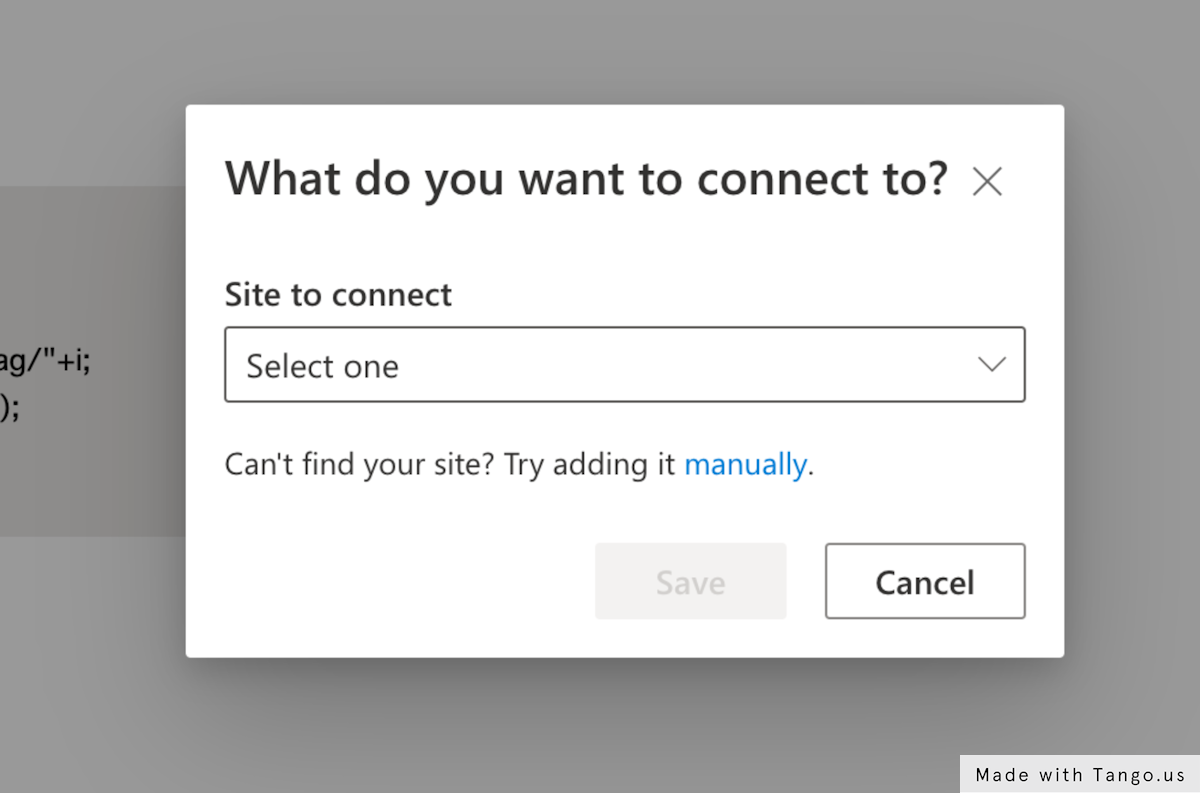
(19) Select the site to link with Clarity (the site you manage in Analytics)
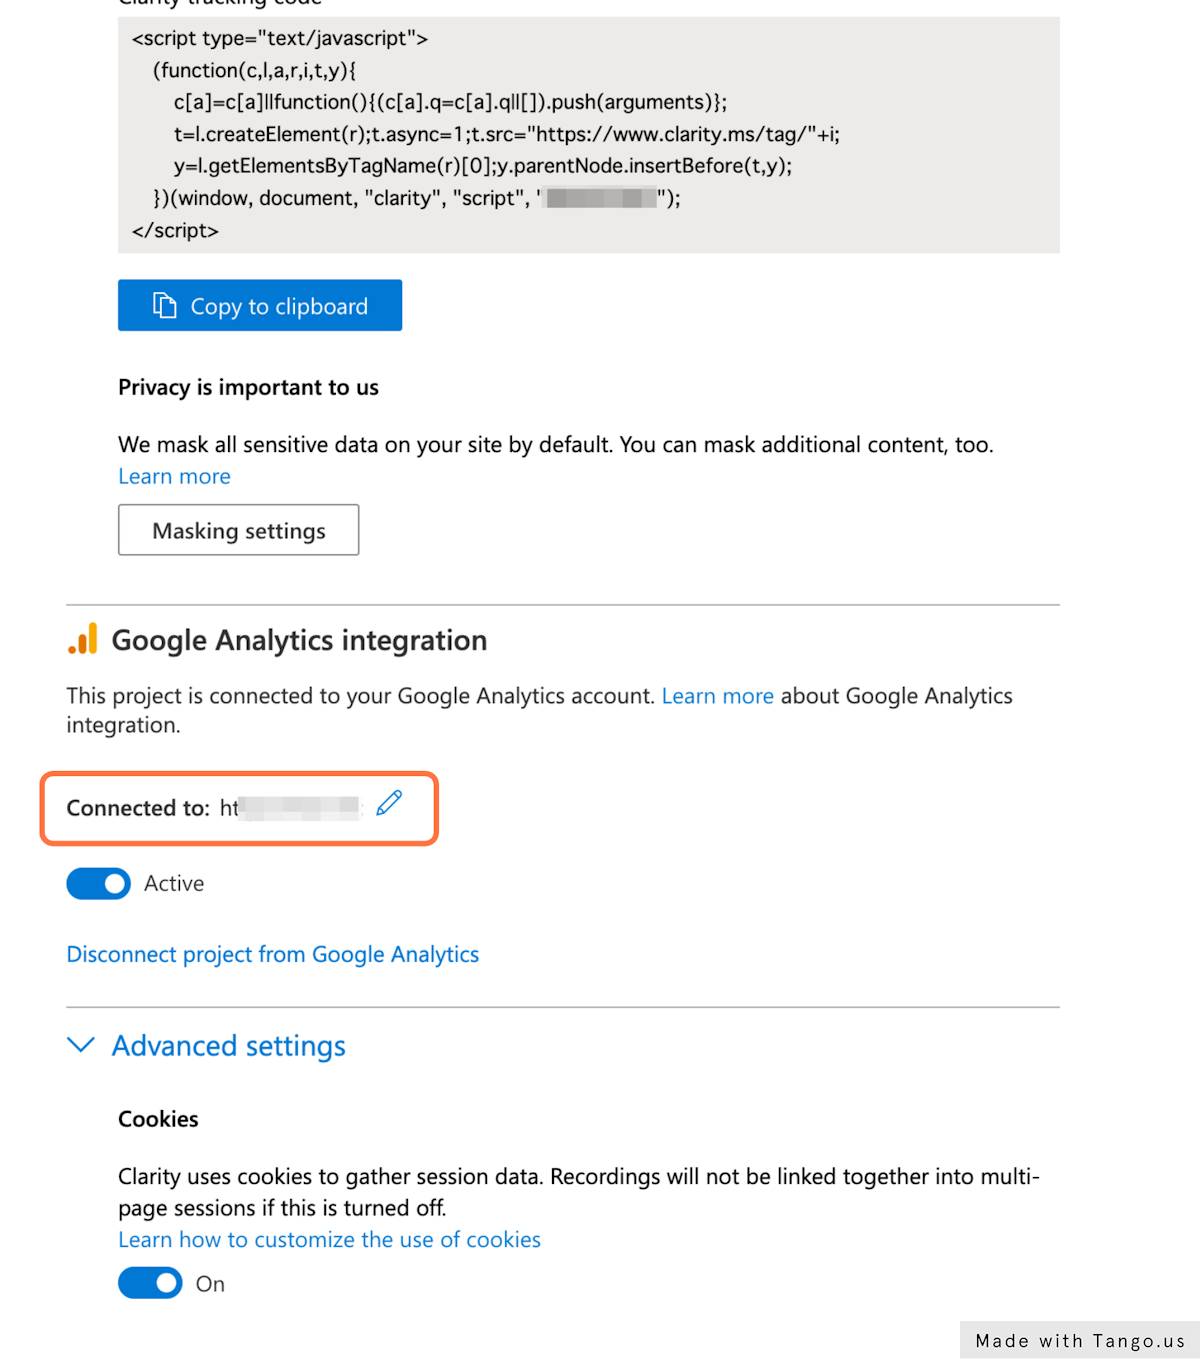
(20) Check whether it's linked with Analytics
In this case, it's linked if "Connected to: [your site URL]" is displayed.
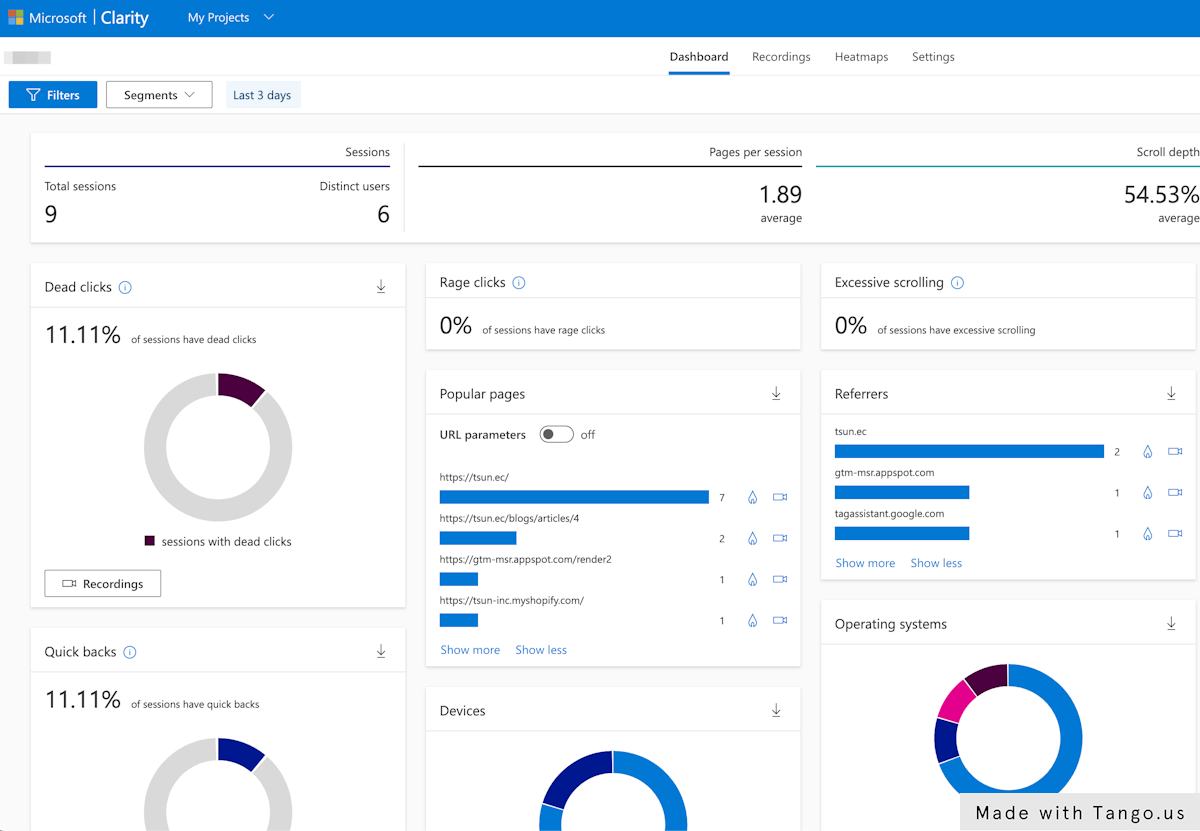
(21) Once Clarity is set up, a dashboard like this appears
*It may take several hours after setting up Tag Manager before this reflects in Clarity.
Frequently Asked Questions
Is it possible to share Clarity data?
Yes. It is possible.
Both heatmap data and recording data can be shared, and you can choose the sharing scope, either "project members (those with viewing permission)" or "anyone (those without viewing permission)," and the sharing method, either "issuing a share link" or "sharing by email."
*A share link for anyone (those without viewing permission) has an expiration date, which can be set from 1 to 30 days.
(How to share via link)
- Click the share icon in the upper right of the screen (hovering over it will show text like "Share [X]")
- Select the "Share link" tab in the popup
- Choose the sharing scope, either "Project team" or "Anyone"
- Copy the displayed URL
- Click the Done button
(How to share via email)
- Click the share icon in the upper right of the screen (hovering over it will show text like "Share [X]")
- Select the "Share via email" tab in the popup
- Enter the email address of the person you want to share with
- Click the Send button
What's a recommended heatmap tool other than Clarity?
If you want to do heatmap analysis on your Shopify store using something other than Clarity, we recommend "Lucky Orange."

Source: Shopify App Store
Lucky Orange is the most popular heatmap app among Shopify apps. It has features such as real-time chat and surveys, offering richer functionality than Clarity.
However, it's billed on a usage basis according to PV (page views), so consider how much budget you can allocate to these features.
The blog article below explains in detail Lucky Orange's pricing plans, how to set it up, and how to use it. Please use it as a reference.

Shopify Apps Worth Using Alongside Clarity
RuffRuff Table of Contents [Table of Contents]
This is the only Shopify app in the world that can automatically generate a table of contents not just for blog articles, but also for product pages, collections, Pages, and more.
You can start using it for free, and it can be set up with no coding required.
You can customize many things, such as the wording, design, whether scrolling is on or off, and the display position of the table of contents. It also has a live preview feature, letting you customize the table of contents while checking the result in real time.
Pricing
Free~
By using "RuffRuff Table of Contents" to show a table of contents on each piece of content, and checking with Clarity which part of the table of contents gets the most clicks, you can understand which part of your content users are looking for.
The article below explains the benefits of adding a table of contents to your Shopify blog articles. Please use it as a reference.

RuffRuff Product & Blog Tags [Tags]
"RuffRuff Product & Blog Tags" displays the tags set on products and blog articles as a list on your online store, helping with "improved access to information such as products and blog articles" and "increased site browsing rate." It's easy to set up with no coding in 3 steps, and you can freely customize the design of the tag list to match your online store's theme design.
Pricing
Free~
By using "RuffRuff Product & Blog Tags" to show a tag list on each page, and checking with Clarity which tags get the most clicks, you can work to understand which tags users are interested in (user needs).
The article below introduces not only the benefits of using tags on Shopify, but also the drawbacks and effective ways to tag content. Please use it as a reference.

In Closing
This article explained in detail the basic information about Microsoft Clarity and how to set it up on your Shopify store (both the Shopify app version and the tag insertion version).
There are 2 ways to set up Clarity:
- Shopify app version: Easy and simple to set up, and you can check data within the Shopify admin
- Tag insertion version: Allows integration with Google Analytics 4 and Google Ads, and advanced settings such as masking sensitive data
Both methods are completely free to use, with no limits on the number of sites or traffic. Please choose the setup method best suited to your store's operating policy and the features you need.
By using Clarity, you can answer questions like "why are visitors leaving?", "where are they getting confused?", and "what are they interested in?" based on data. Through features such as session analysis, heatmap analysis, and recording analysis, keep making ongoing improvements to your site and content, and use them to improve usability and boost your order rate.
Also, by using Shopify apps like "RuffRuff Table of Contents" and "RuffRuff Product & Blog Tags" alongside Clarity, you can carry out more detailed user behavior analysis and improvement measures.
Use data-driven decision-making to accelerate the growth of your Shopify store.


