

"RuffRuff 予約販売" helps reduce the lost sales opportunities that occur during out-of-stock periods, before a new product launch, or while waiting for restocking.
It makes it remarkably easy to set up pre-orders on your own Shopify store, letting you register an unlimited number of pre-order products and accept an unlimited number of pre-orders. It can also restrict customers from ordering pre-order and regular products together, and can send restock notifications when the arrival date is undetermined.
It also has many unique features not found in other pre-order apps, such as a "deferred payment" feature that lets you collect payment before the product ships.
This article explains the basic information about "Google Analytics 4," and how to set up "Google Analytics 4" on Shopify, aimed at those just starting to open a Shopify store (beginners).
What Is Google Analytics 4?
Google Analytics 4 (referred to below as GA4) is a website traffic analysis tool. It can measure how many users visit your site on a per-page basis, and lets you check various data such as traffic sources and the number of conversions.
GA4 is a new version of Google Analytics released in October 2020.
The current version of Google Analytics that many people still use is called "Universal Analytics" (referred to below as Universal).
Since March 2023, you've been able to set up GA4 from within the Google channel (Shopify app).
How to Set Up GA4 Using the Google Channel (Shopify App)
In March 2023, there was a feature update that let you set up GA4 from within the Google channel (Shopify app). This section introduces how to set up GA4 via the Google channel (Shopify app).
This setup requires a Google account. If you haven't created a Google account yet, please create one using the links below.
If you're creating a personal Google account, click here
If you're signing up for Google Workspace as a company or team, click here
If you're considering Google Workspace, please also make use of the following promo codes.
Google Workspace Business Starter, 10% off
Promo code: C3FHYQJTEX74TNY
Google Workspace Business Standard, 10% off
Promo code: R6TQLHQC44NYNAH
Setting up GA4 involves the following 4 steps:
- Create a new account in Google Analytics
- Install the Google channel (Shopify app)
- Authenticate your Google account within the Google app
- Link GA4 to your Shopify store within the Google app
Create a New Account in Google Analytics
1. Go to Create Account
Go to Google Analytics and click "Create Account"
*You can access Google Analytics here
2. Enter Information in Account Setup
① In Account Setup, enter an account name of your choosing
② Check the data sharing settings
③ Click "Next"
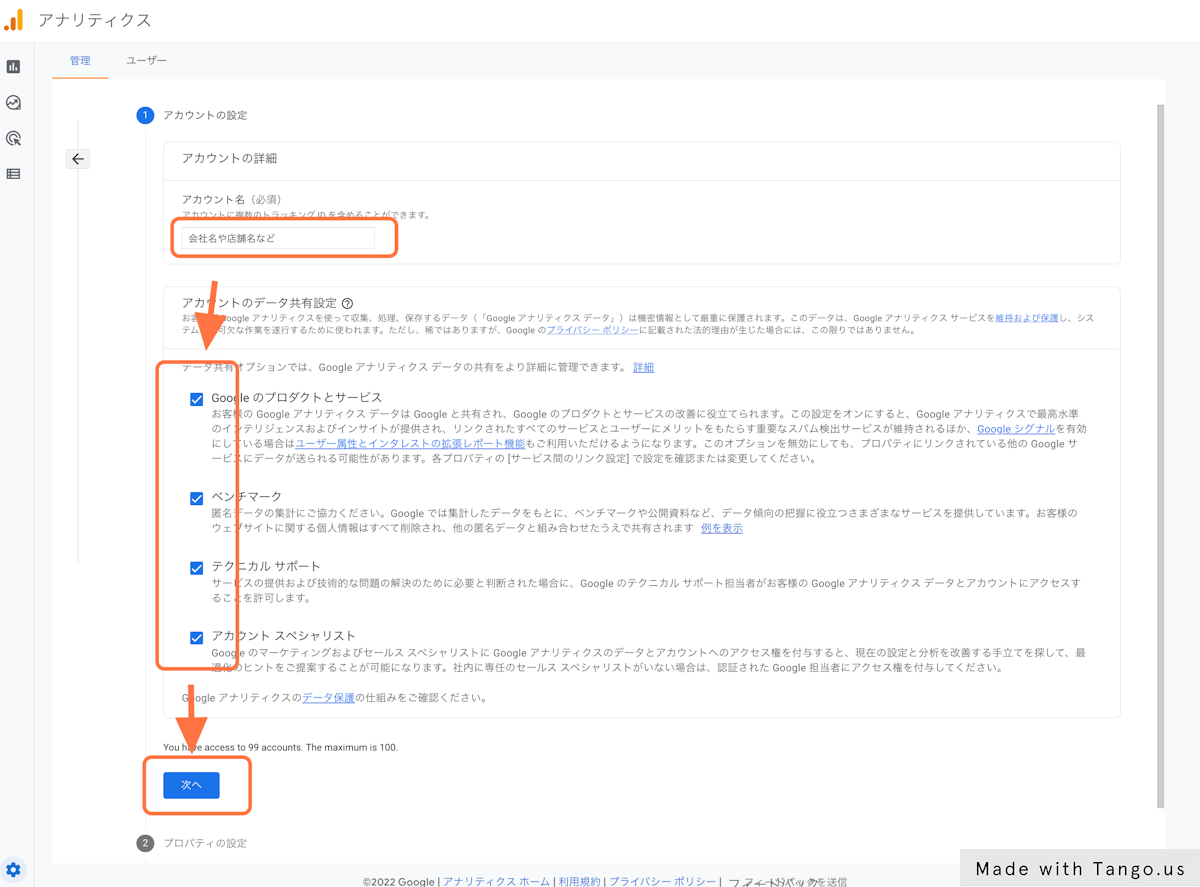
3. Enter Information in Property Setup
① Property name
② Time zone
*It's a good idea to select Japan here
③ Click "Next."
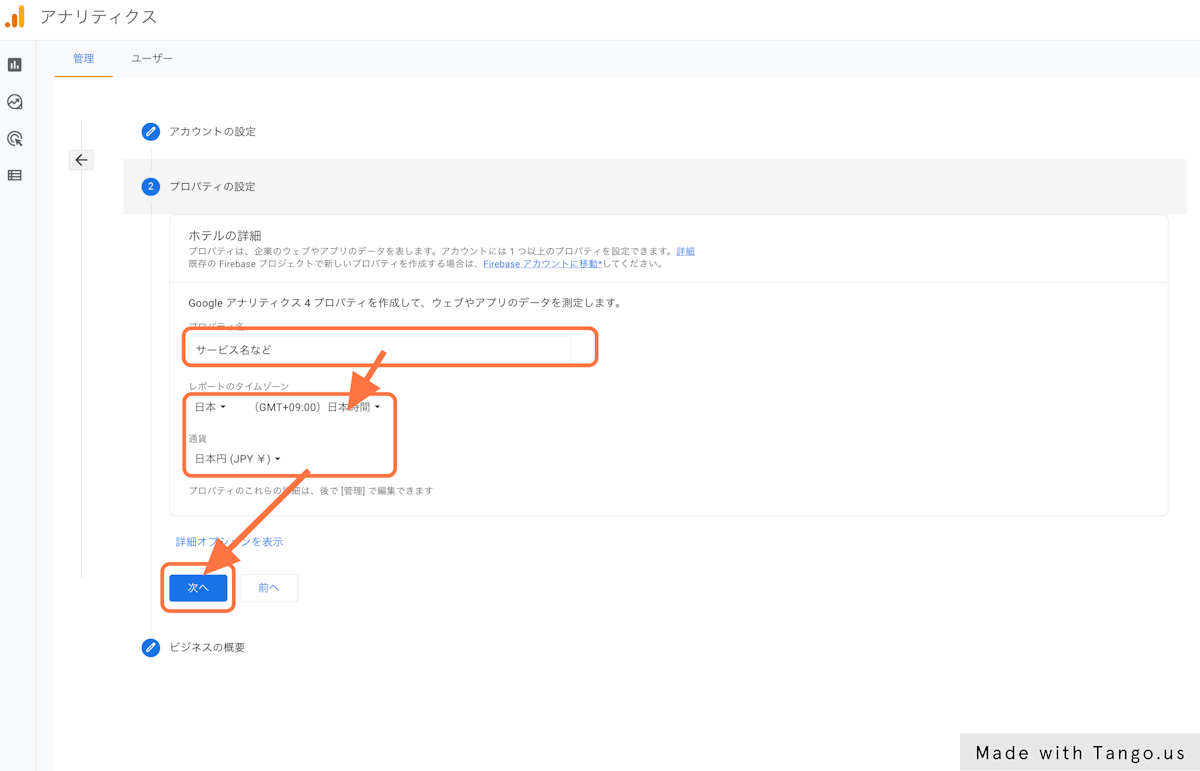
4. Enter a Business Overview
① Select your industry *Please select the industry that best fits you
② Select your business size
③ Select your intended use for GA4
④ Click "Create"
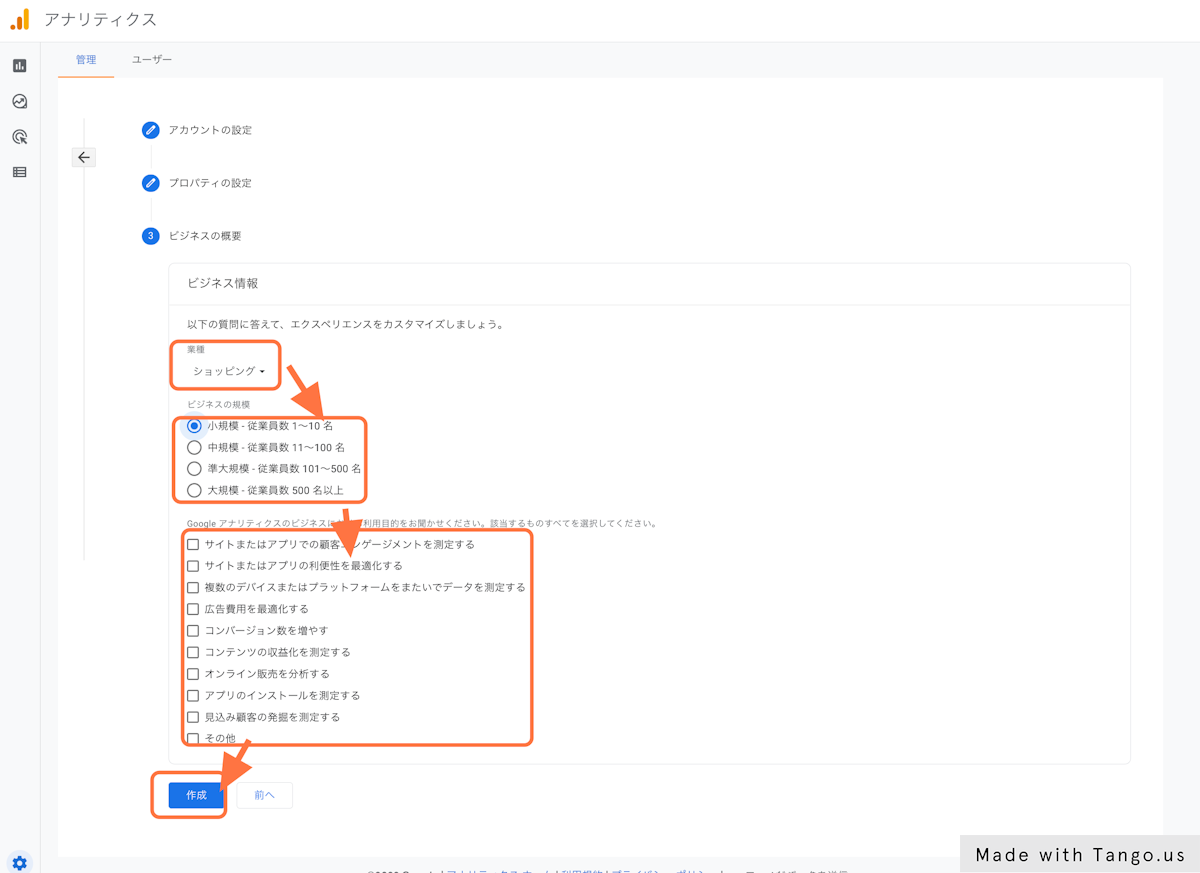
5. Agree to GA4's Terms of Service
① Read the content carefully and check the checkboxes
*There are 2 checkboxes
② Click "I Accept"
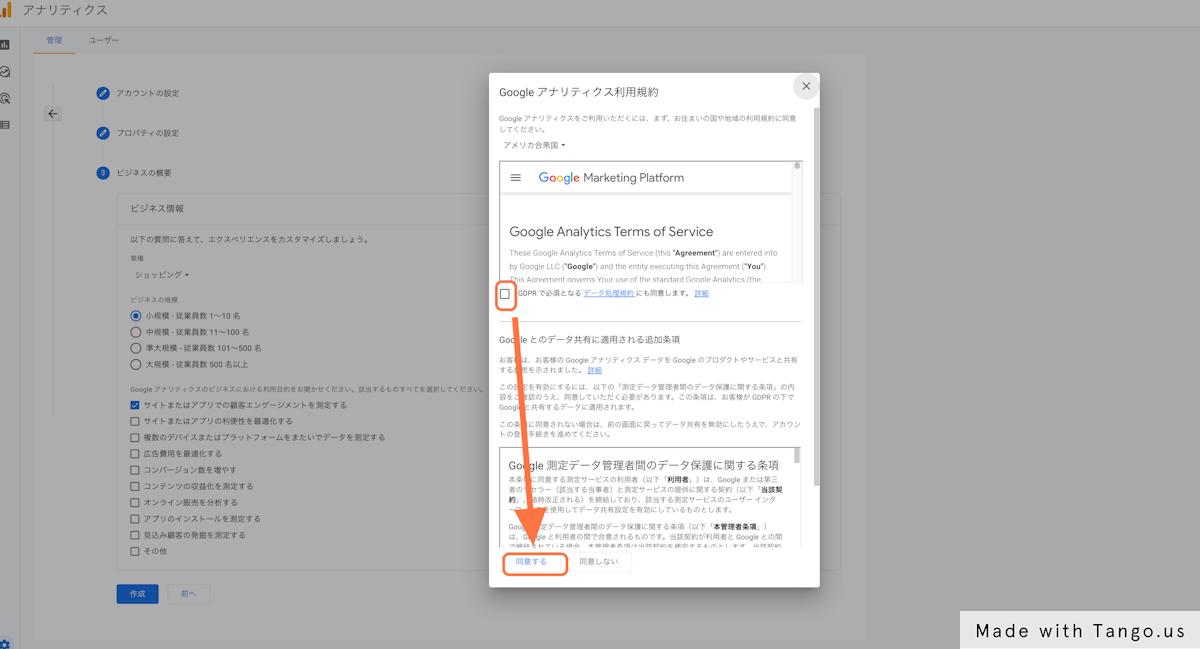
Install the Google Channel (Shopify App)
Use the button below to go to the Shopify App Store, click "Add app," and install the app.
Google Channel [External Channel Integration]
![Google Channel [External Channel Integration] | Shopify App](https://cdn.shopify.com/s/files/1/0611/3542/1693/files/shopify-apps-_recommend-30.png)
Google Channel is a Shopify app recommended if you want to run Google Shopping ads.
Using this app synchronizes your product data in Shopify with Google Merchant Center (the Google service used to run Google Shopping ads).
Source: https://tsun.ec/blogs/articles/50
Pricing: Free
Authenticate Your Google Account Within the Google App


Link GA4 to Your Shopify Store Within the Google App


How to Set Up GA4 Using Google Tag Manager
This section introduces how to set up GA4 using Google Tag Manager. If you haven't set up Tag Manager on Shopify yet, please refer to the article below.

Setting up GA4 involves the following 4 steps:
- Create a new account in Google Analytics 4
- Copy GA4's "Measurement ID"
- Paste the "Measurement ID" into Tag Manager
- Check the configuration in Preview, then publish
Google Tag Manager

Google Tag Manager (referred to below as Tag Manager) is a free "tag management tool" from Google that lets you manage a variety of tags all in one place.
You can centrally manage not only measurement tags such as Google Analytics (referred to below as Analytics) and heatmap tools, but also advertising tags such as Google Ads and social media ads, and tags for adding web chat and chatbots.
Source: https://tsun.ec/blogs/articles/3
Pricing: Free
The article below explains basic information, benefits and drawbacks, and how to set up Google Tag Manager on Shopify.
Create a New Account in Google Analytics
1. Go to Create Account
Go to Google Analytics and click "Create Account"
*You can access Google Analytics here
2. Enter Information in Account Setup
① In Account Setup, enter an account name of your choosing
② Check the data sharing settings
③ Click "Next"
3. Enter Information in Property Setup
① Property name
② Time zone
*It's a good idea to select Japan here
③ Click "Next."
4. Enter a Business Overview
① Select your industry *Please select the industry that best fits you
② Select your business size
③ Select your intended use for GA4
④ Click "Create"
5. Agree to GA4's Terms of Service
① Read the content carefully and check the checkboxes
*There are 2 checkboxes
② Click "I Accept"
Copy GA4's "Measurement ID"
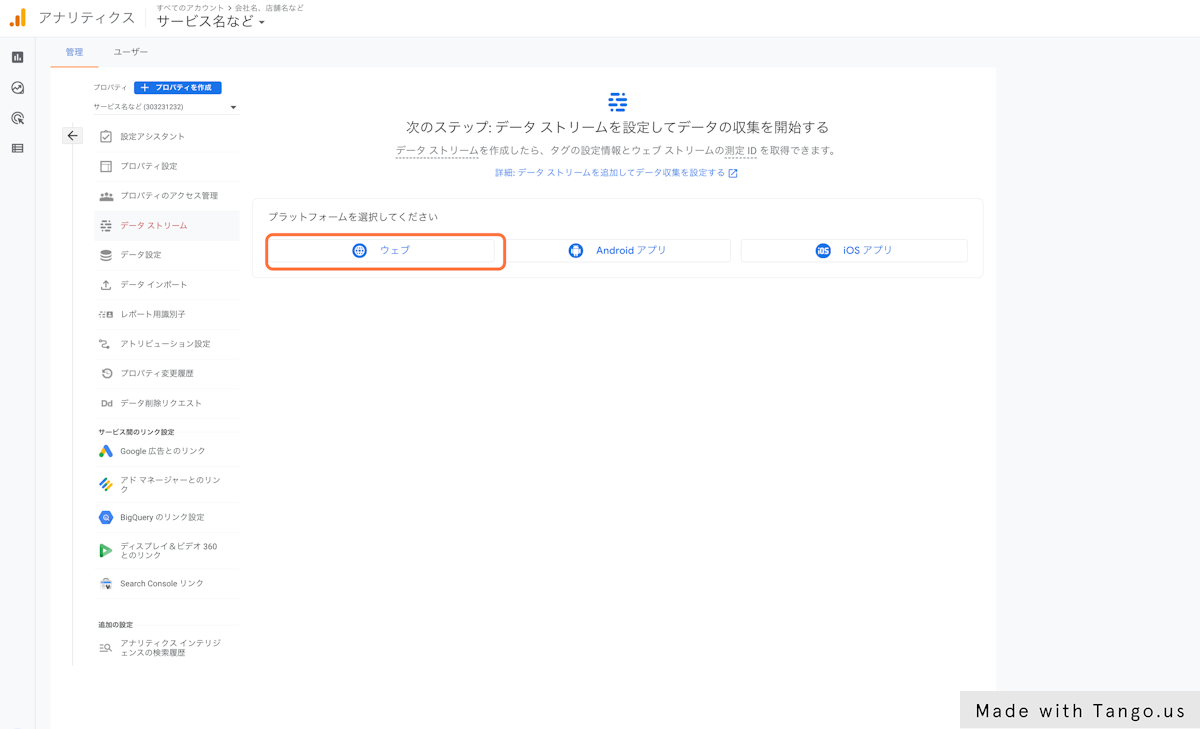
6. Select a Platform
Since this time we're setting it up on Shopify, select "Web"
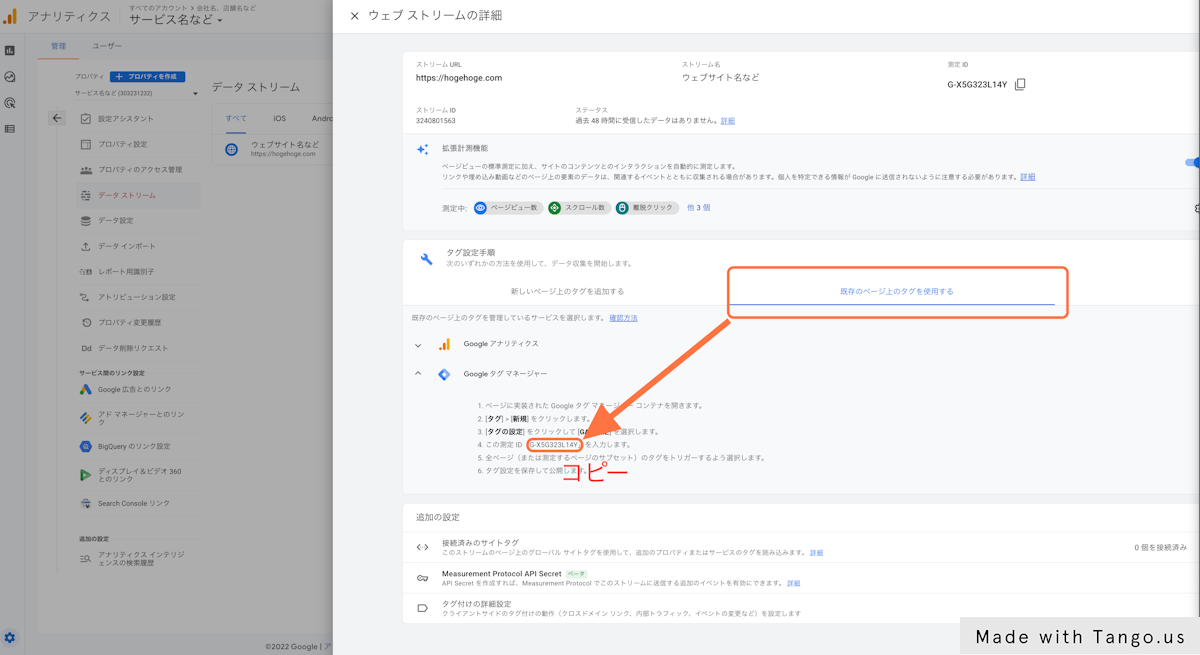
7. Copy the Measurement ID From the Tag Setup Steps
① Click the "Use existing on-page tag" tab
② Copy the displayed "Measurement ID"
Paste the "Measurement ID" Into Tag Manager
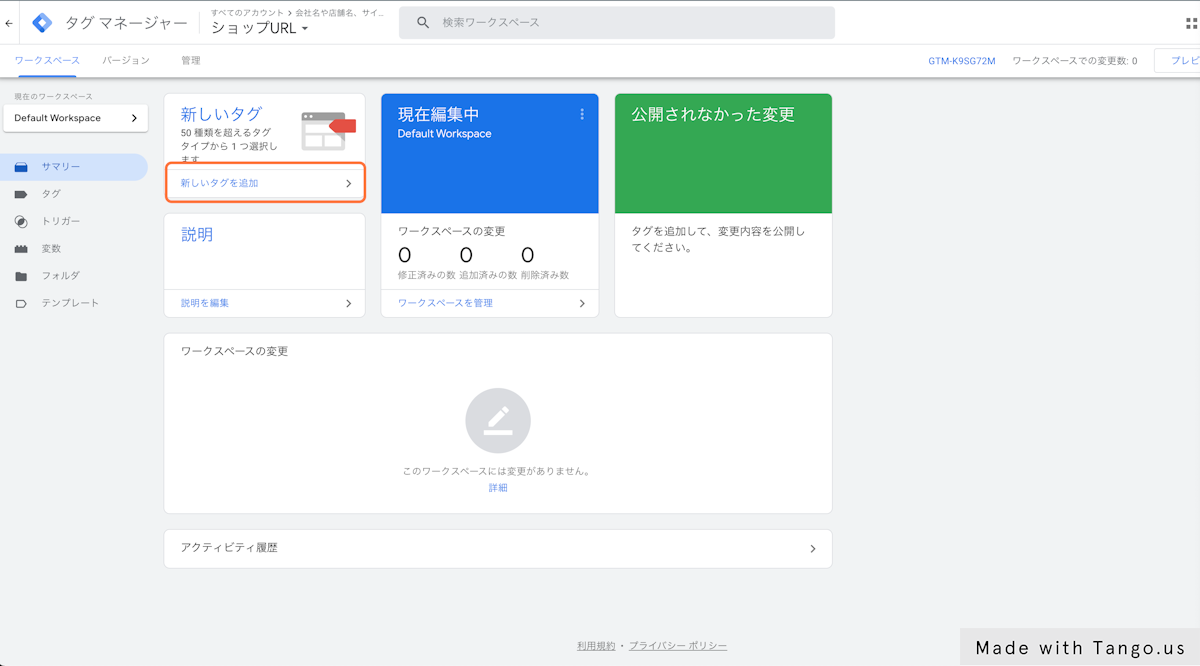
8. Add a New Tag in Google Tag Manager
① Go to Google Tag Manager
② Click "Add a new tag"
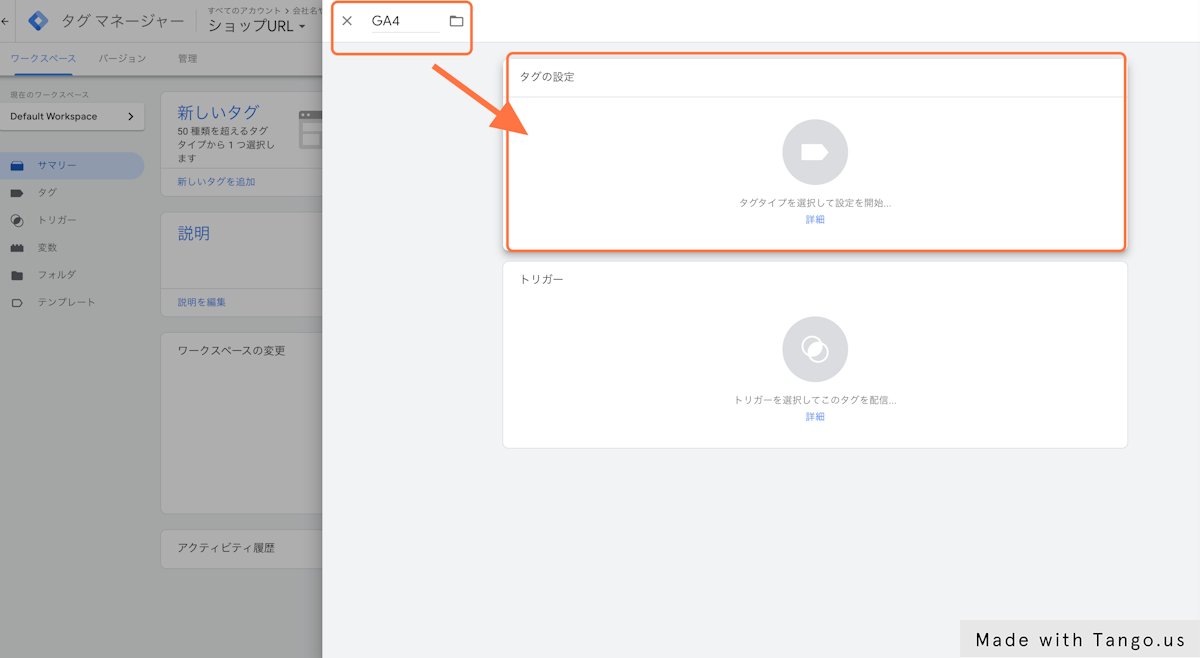
9. Enter a Tag Name, Then Go to Tag Configuration
① Enter a tag name
*Here, for clarity, we've entered "GA4"
② Click "Tag Configuration"
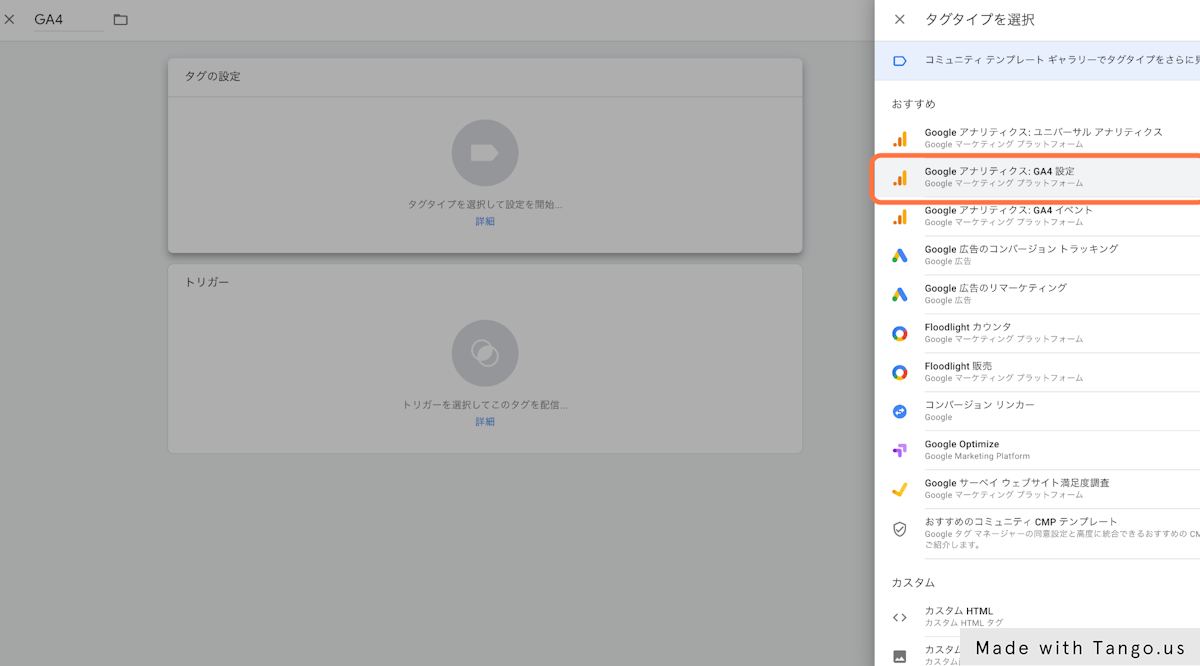
10. Select "Google Analytics: GA4 Configuration" From the Tag Types
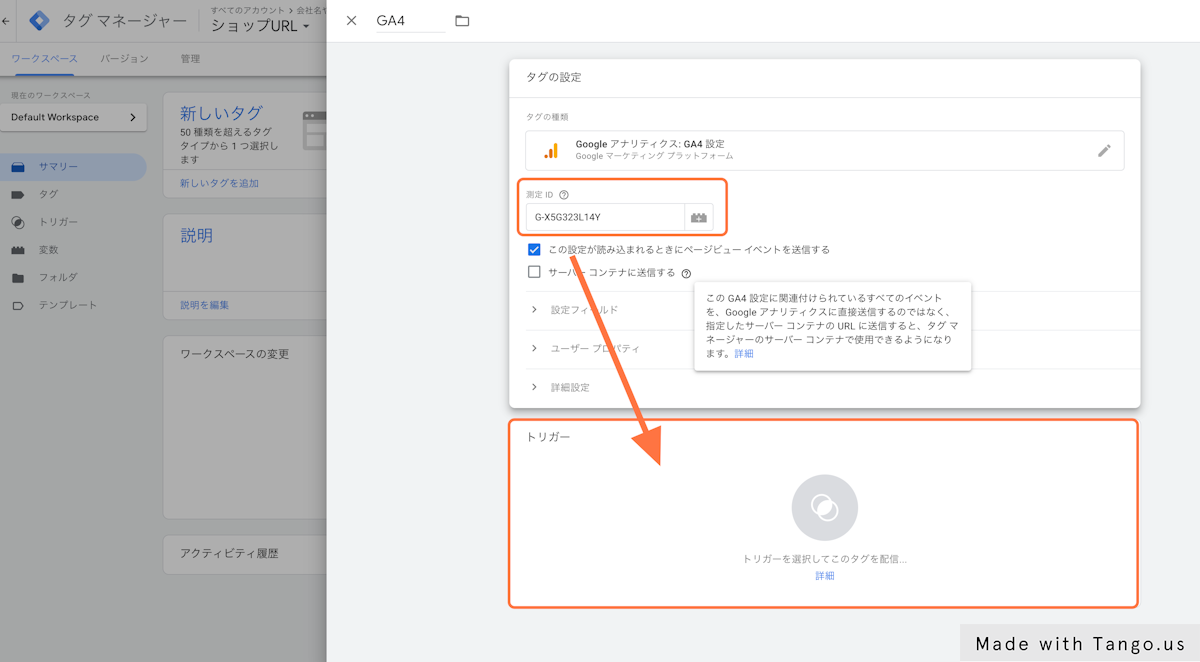
11. Enter (Paste) the Measurement ID
① Enter the Measurement ID you copied earlier from Google Analytics
② After entering it, click Triggering
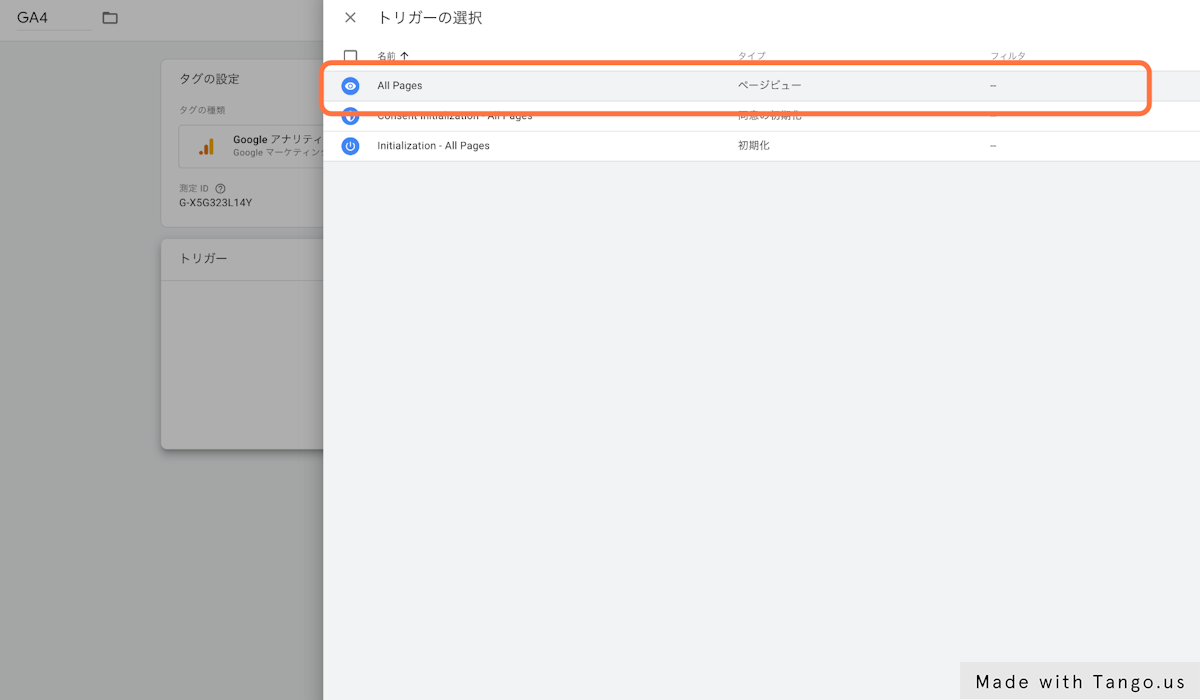
12. Select "All Pages" From Triggering
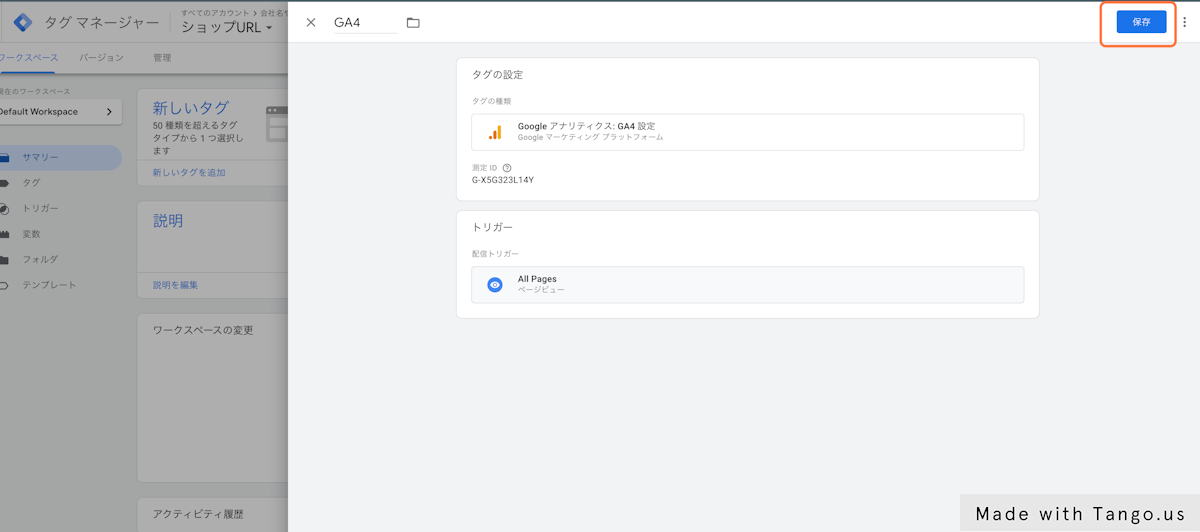
13. Click Save
Check that the following are set up correctly, and if everything looks fine, click Save
・The Tag Configuration has "Google Analytics: GA4 Configuration" and the Measurement ID entered
・"All Pages" is set for Triggering
Check the Configuration in Preview, Then Publish
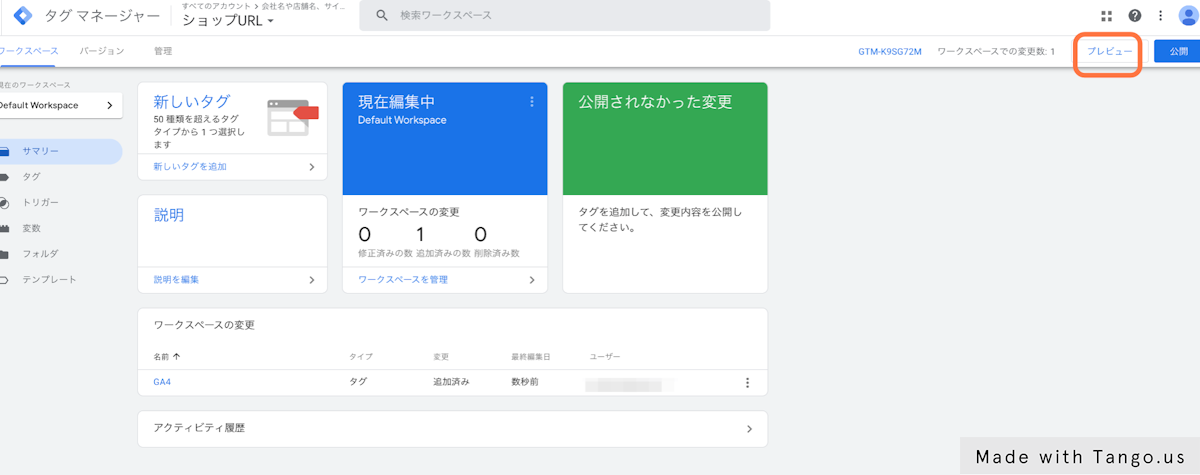
14. Click Preview
Next, let's use Preview to check that everything is set up correctly.
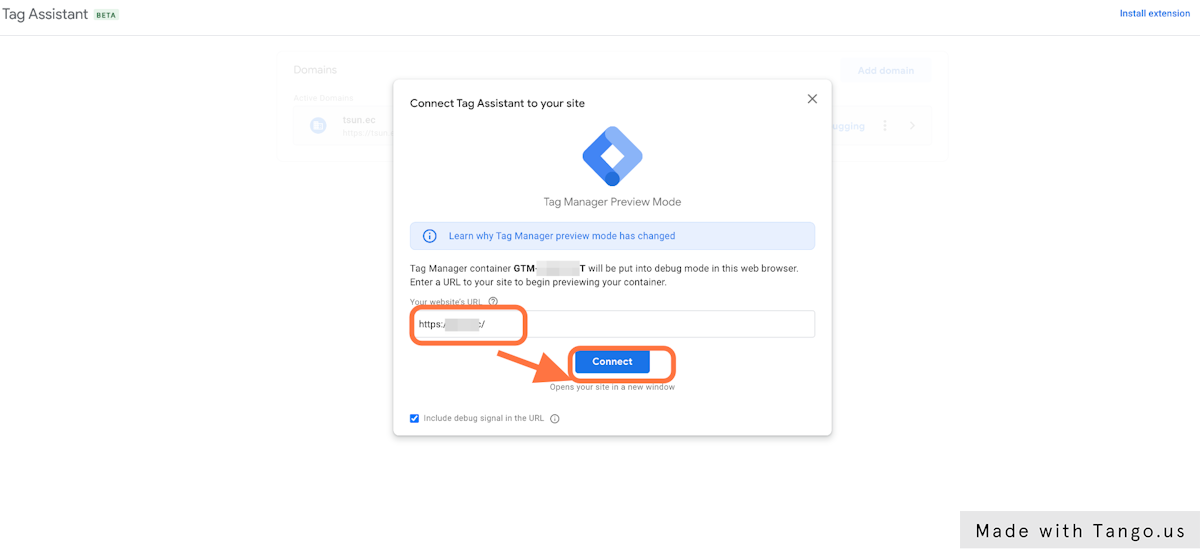
15. Enter the URL of the Site Where You're Setting Up GA4, and Click Connect
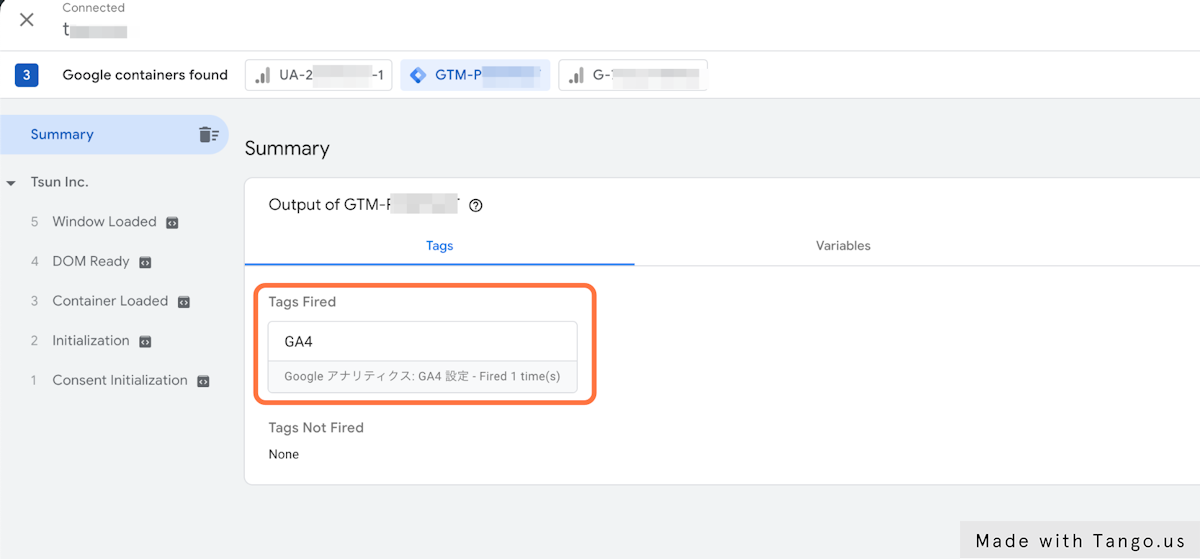
16. Check Whether the Tag Is Firing
If the GA4 tag appears under "Tag Fired," it's set up correctly.
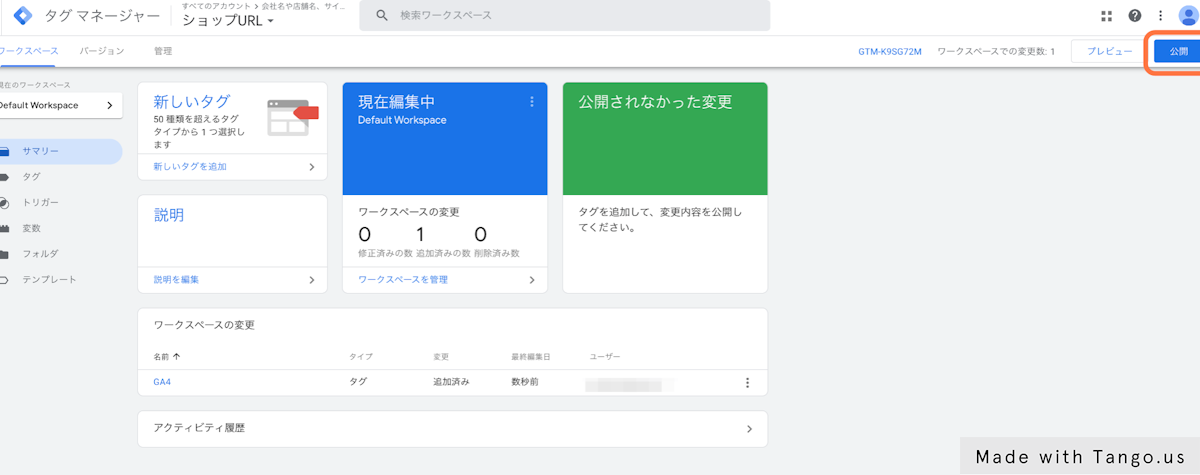
17. Finally, Click Publish
By following the steps above, you can set up GA4 on Shopify.
Recommended Initial Settings After Setting Up GA4
Change the Data Retention Period to "14 Months"
Making this setting lets you change the retention period for event data and user data (excluding age, gender, and interest category data) from 2 months to 14 months.
Reference: Analytics Help
Unless you have a specific reason to keep it at 2 months, we recommend setting the data retention period as long as possible.
(How to configure)
- Click, in order: Admin > Property > Data Settings > Data Retention
- Change the event data retention to "14 months" and save

Excluding Home or Office IPs
How to Link GA4 With Search Console
Benefits of Linking GA4 With Search Console
By linking GA4 with Search Console, you can analyze the customer acquisition and performance of your entire website all at once, including traffic from search engines, and by understanding the relationships between search keywords, ranking, click count, and conversion count, you can plan effective measures from both a customer acquisition strategy and on-site improvement perspective.
How to Link Them

Click Admin in Google Analytics, then click the Search Console link.

Click "Link" in the top right of the Search Console linking screen.

From the Select Search Console property section, click "Choose account."

Check the box for the Search Console property you want to link with GA4, then click "Confirm."
*Please note that properties whose ownership hasn't been verified will not be displayed.

Confirm the selected property is correct, then click "Next."

Select the web stream, then click Next.

If the property and web stream you're linking look correct, click Submit.

Once you see a screen like the one above, the linking is complete.
Recommended External Tools to Set Up Besides GA4
Microsoft Clarity

This is a free behavior analysis tool provided by Microsoft. It's completely free and lets you perform "session analysis," "heatmap analysis," and "recording analysis" on your own Shopify site
Source: https://tsun.ec/blogs/articles/5
Pricing: Free
The article below explains basic information about Clarity and how to set it up on Shopify.

Google Tag Manager
Google Tag Manager (referred to below as Tag Manager) is a free "tag management tool" from Google that lets you manage a variety of tags all in one place.
You can centrally manage not only measurement tags such as Google Analytics (referred to below as Analytics) and heatmap tools, but also advertising tags such as Google Ads and social media ads, and tags for adding web chat and chatbots.
Source: https://tsun.ec/blogs/articles/3
Pricing: Free
The article below explains basic information, benefits and drawbacks, and how to set up Google Tag Manager on Shopify.
Google Search Console

This is a free Google service that helps you monitor, manage, and improve your site's ranking in Google search results.
Source: Google Search Console
For a Shopify site focused on driving traffic through SEO, this is an essential service for running a proper PDCA cycle on your SEO efforts.
Pricing: Free
The article below introduces the basics of SEO, SEO measures you can take on Shopify, and recommended Shopify apps for SEO. Please use it as a reference.


