

"RuffRuff 予約販売" helps reduce the lost sales opportunities that occur during out-of-stock periods, before a new product launch, or while waiting for restocking.
It makes it remarkably easy to set up pre-orders on your own Shopify store, letting you register an unlimited number of pre-order products and accept an unlimited number of pre-orders. It can also restrict customers from ordering pre-order and regular products together, and can send restock notifications when the arrival date is undetermined.
It also has many unique features not found in other pre-order apps, such as a "deferred payment" feature that lets you collect payment before the product ships.
This explains the basic information about Google Tag Manager, its benefits and drawbacks, and how to set it up on Shopify.
* This time, we're using the Dawn 3.0 theme.
What Is Google Tag Manager?
Google Tag Manager (referred to below as Tag Manager) is a free "tag management tool" from Google that lets you manage a variety of tags all in one place.
You can centrally manage not only measurement tags such as Google Analytics (referred to below as Analytics) and heatmap tools, but also advertising tags such as Google Ads and social media ads, and tags for adding web chat and chatbots.
*As of February 2022, if you want to set up Google Analytics 4 (referred to below as GA4) on Shopify, you need to do so via Tag Manager. After setting up Tag Manager, we recommend using the article below as a reference to proceed with GA4 setup.

What Are the Benefits of Setting Up Tag Manager?
There are 5 benefits to setting up Tag Manager.
- Managing tags becomes easier since you don't need to edit HTML
- Makes it easier to manage many tags and to have multiple people working on it
- You can check that everything works using Preview before publishing
- You can respond quickly if something goes wrong
- Page loading speed becomes faster
We'll explain each of these in detail.
Managing Tags Becomes Easier Since You Don't Need to Edit HTML
Without needing to individually edit HTML source code, you can check and change the tags on all your pages at once from Tag Manager.
Even non-engineers can easily insert tags.
Makes It Easier to Manage Many Tags and to Have Multiple People Working on It
As you add more tags, the following kinds of problems tend to occur.
・You lose track of which tag is inserted on which page
・It becomes easier to accidentally miss setting up a tag
Using Tag Manager lets you manage your tags in a single list, so
・Which tags are inserted
・Whether any tags are missing
and more can be easily checked
Also, if you want to check which page a tag is inserted on, you can check by clicking the relevant tag from the tag list and viewing its details.
This makes things visible and convenient even when multiple people are managing it, and by granting permissions, you can also ask an ad agency or similar to handle tag configuration work for you.
You Can Check That Everything Works Using Preview Before Publishing
Tag Manager has a preview mode that lets you check whether an inserted tag is working correctly.
・Is the measurement tag correctly measuring data?
・Is the tool you want to set up actually working?
・Is it working on the intended page?
・Has setting up the tag caused any unintended behavior?
You can reassuringly test things like this in preview mode before clicking the publish button.
If everything is working correctly, clicking the publish button reflects the changes on your actual page.
You Can Respond Quickly if Something Goes Wrong
Tag Manager has a version management feature.
With this feature, if something goes wrong with the currently published version, you can immediately roll back to the state before the issue occurred.
When you make a new change in Tag Manager, a new version is automatically created, so even if you stop editing partway through, you can resume editing from where you left off.
Page Loading Speed Becomes Faster
Delivering tags using Tag Manager results in faster loading speed compared to writing tags directly into your HTML source.
This is because all tags are forcibly delivered as asynchronous tags.
What Are the Drawbacks of Tag Manager?
It Doesn't Support Every Tag
Tag Manager doesn't support absolutely every kind of tag. Some tags aren't supported, so this is something to keep in mind.
Steps to Set Up Tag Manager
1. Create an Account
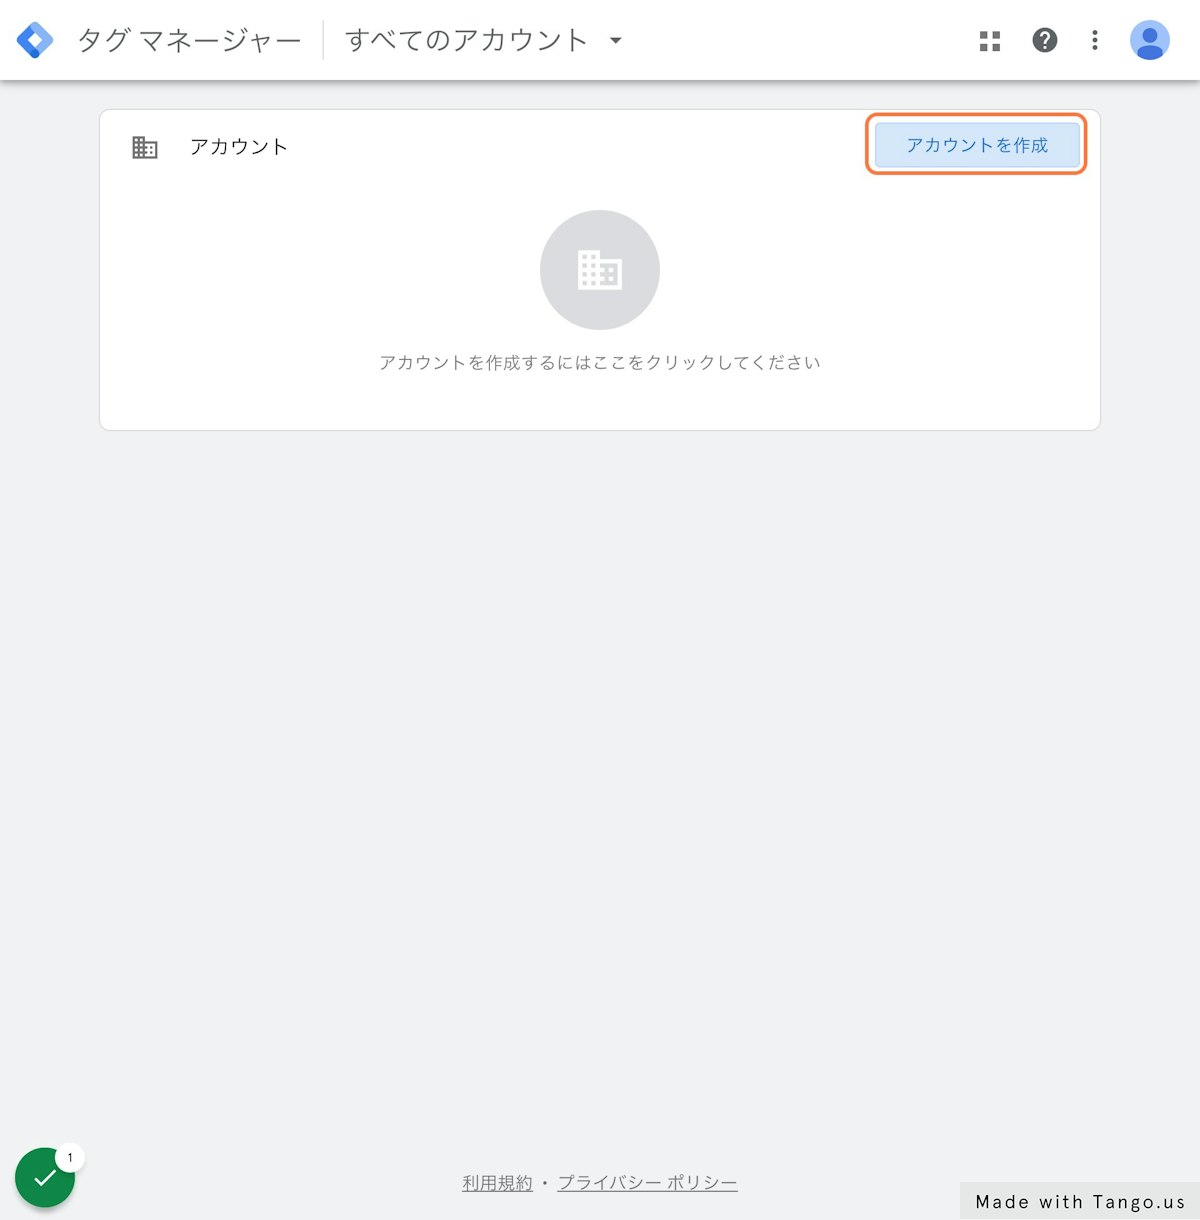
Go to Tag Manager, click the "Create Account" button, and proceed to create your account.
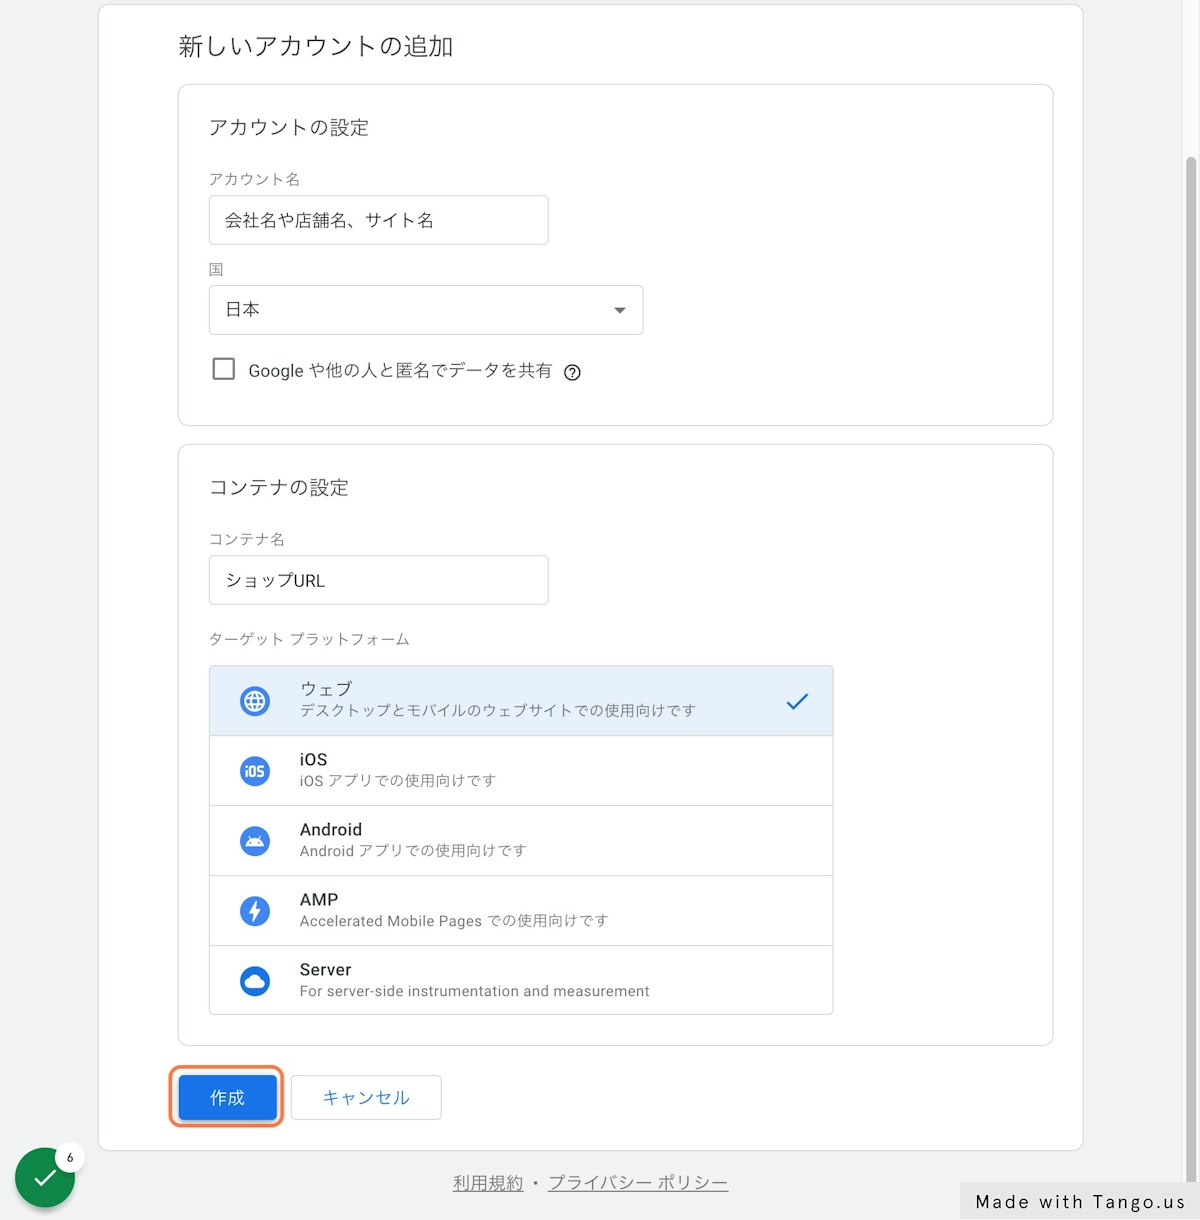
・Enter an Account Name
The account name is often your company name or store name.
・ Select a Country
・Enter a Container Name
*A container is like a box that holds your tags. We recommend entering your site name or URL as the container name, since it's easy to recognize.
・Select a Target Platform
*Since this time we're setting it up on Shopify, let's select "Web."
・Click the Create Button
Once you've entered all the information, click the Create button
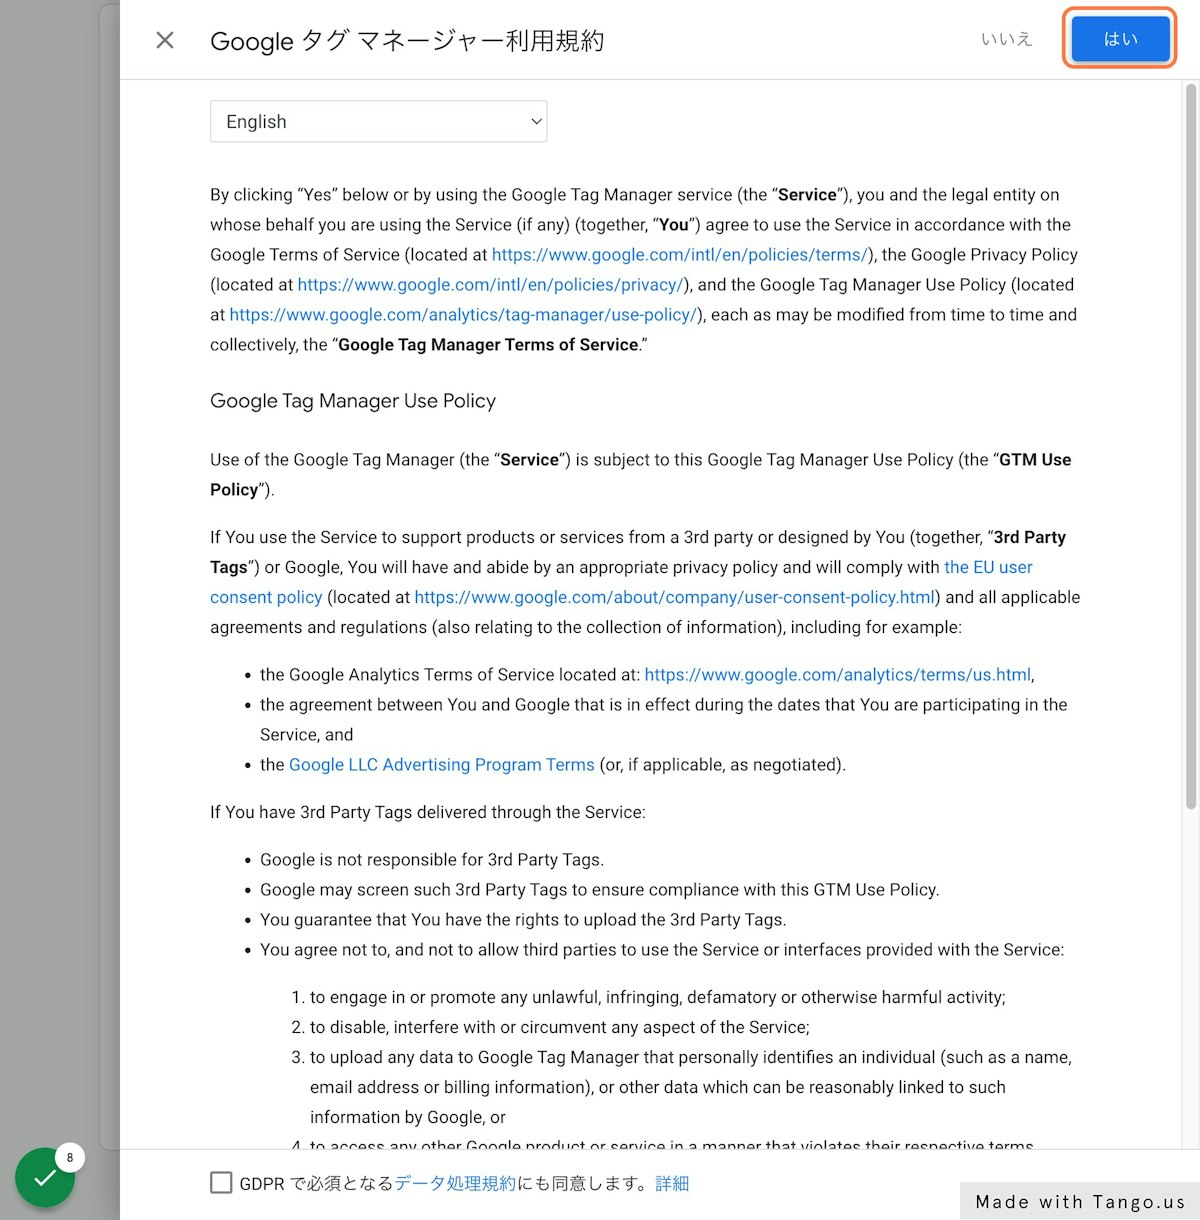
Agree to Tag Manager's Terms of Service
Read Tag Manager's terms of service, and if you have no issues, accept them.
*As of February 2022, there are no Japanese terms of service
2. Insert Tag Manager's Source Code Into Shopify
Once you've agreed to the terms of service, a popup titled "Install Google Tag Manager" will appear.
Inside the popup, the source code to insert into Shopify is displayed.
Copy Tag Manager's Source Code (Top)
First, copy the source code shown at the top of the popup

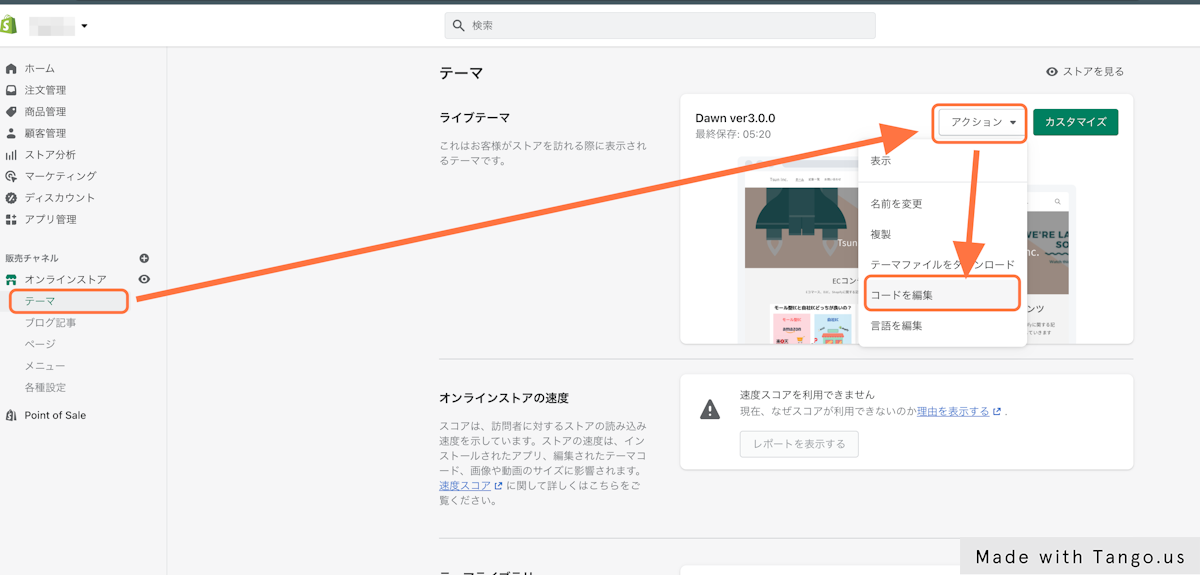
Open the "Edit Code" Screen
Select "Themes" → "Actions" → "Edit code."
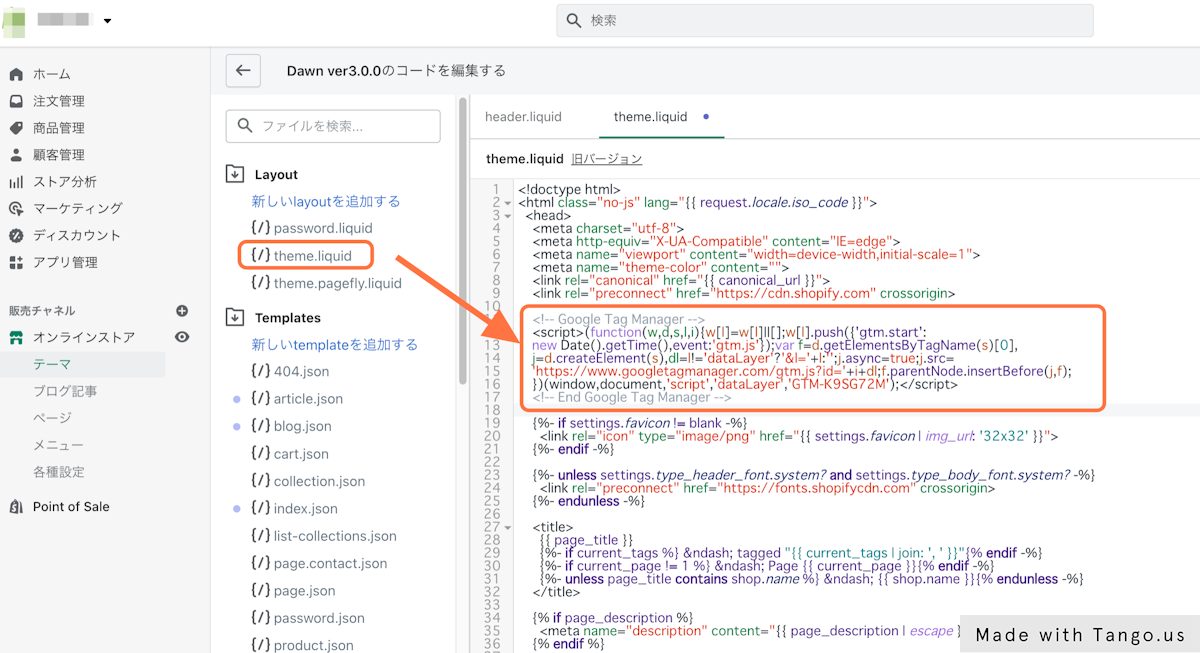
Add (Paste) the Source Code Near the Top of theme.liquid
Paste it as near the top as possible within the <head> of theme.liquid.
Copy Tag Manager's Code (Bottom)
Next, copy the code shown at the bottom of the popup

Add It Inside the <body> Tag of theme.liquid
Paste it as close to directly below as possible, right inside the <body> of theme.liquid.

Set (Paste) the Code Into Additional Scripts in Checkout Settings
Paste the Tag Manager code (top) you copied earlier into "Settings" > "Checkout" > "Additional scripts." That completes the setup process.

That completes the Tag Manager setup process.
Services Worth Setting Up Alongside Google Tag Manager
After setting up Google Tag Manager, here are some services worth setting up using Google Tag Manager.
- Google Analytics 4 (GA4)
- Microsoft Clarity
- Google Optimize
We'll explain each in detail.
Google Analytics 4 (GA4)

Google Analytics 4 (referred to below as GA4) is a traffic analysis tool, and is a new version of Google Analytics released in October 2020.
The current version of Google Analytics that many people still use is called "Universal Analytics" (referred to below as Universal).
As of December 2022, Shopify doesn't support GA4 directly, so you need to set up GA4 via Google Tag Manager (referred to below as Tag Manager).
Source: https://tsun.ec/blogs/articles/4
Pricing: Free
The article below explains basic information about GA4 and how to set it up on Shopify.
Microsoft Clarity

This is a free behavior analysis tool provided by Microsoft. It's completely free and lets you perform "session analysis," "heatmap analysis," and "recording analysis" on your own Shopify site
Source: https://tsun.ec/blogs/articles/5
Pricing: Free
The article below explains basic information about Clarity, a heatmap analysis and behavior analysis tool, and how to set it up on Shopify.

Google Optimize

This is a free web testing tool provided by Google.
In addition to A/B testing, it also supports multivariate testing, redirect testing, and server-side testing, and its visual editor lets you intuitively edit design and text when setting up a test. It also has a personalization feature that lets you show different content to different users.
We recommend setting it up if you want to run A/B tests to improve your Shopify site's conversion rate.
If you want to run many tests at the same time, you'll need to sign up for the paid Optimize 360.
Source: https://tsun.ec/blogs/articles/38
Pricing: Free
The article below explains in detail the basic information about Google Optimize and how to set it up on your Shopify site. Please use it as a reference.

If You'd Also Like Help Setting Up Tag Manager, Talk to Tsun!
To run Shopify, you need to set up your site so it can be measured using Tag Manager.
If you find "setting up Tag Manager too much of a hassle," or you're "also considering setting up GA4 or other measurement tools," another option is to get support from an outside vendor.
Tsun Inc. can support you not only with setting up Tag Manager, but end-to-end, from building your e-commerce site through to growing it! Tsun also has staff with experience as marketing managers at major e-commerce malls, so we can also help those who want to run their own e-commerce site alongside a mall-based store at the same time.
If you're considering building and running your own e-commerce site, please contact Tsun, which combines extensive programming knowledge with marketing expertise.


